

For those of you who already know various things about the world of computers, and how to set up Mikrotik settings, you may already be familiar with this one brand, especially if it’s not Mikrotik which is very famous in the world of computer networks.
Mikrotik is a Latvian network equipment manufacturer. The company develops and sells wired and wireless network routers, network switches, access points, and additional operating systems and software. The company was founded in 1996 with a focus on selling equipment in emerging markets. If you are interested in Mikrotik products, you can check them here.
Table of Contents
How to Setting Mikrotik
In this tutorial, we will review the steps for Mikrotik settings the standard proxy. The point of this tutorial is that Mikrotik is ready to use at home, school or office.
But if you are not clear about Mikrotik, you will encounter difficulties in using it and getting into the Mikrotik itself.
In this case, I will use Winbox, so that the configuration can run together with the appearance of the GUI (Graphic User Interface).
Before configuring the proxy, you should first determine the network topology. Currently the topology used is still simple. Look at the picture:

Can be seen in the picture above, there is 1 link to the outside, namely to the internet network. Let’s say we are given an IP by the isp with the 192.168.22.0/30 network. for ip router 192.168.22.2 and for the gateway 192.168.22.1
- The first step is, connect port 2 to the mikrotik modem, and port 3 to your pc. Run the winbox, then open the Neighbors tab.
Open the Winbox application, then fill in the column in Winbox like this:
- Connect To = MAC address
- Login = admin
- Password = Please leave it blank
- then click “Connect”
- After you enter the Mikrotik GUI, first of all we will feel together changing the interface name, so that it doesn’t bother you to figure which port to which.
- Click the Interface button, a new window will appear, namely the list interface.
- Double click on one of the interfaces to change the name of the interface. You try to give the name “Ethernet 2” (WAN) this is a link to the ISP / Mode
- Then to “Ethernet 3” (LAN)
- Next, give IP to each Ethernet, first we give IP to the internet interface (IP given by the ISP) , here’s how:
- Click IP> address> “+”
- Address = 192.168.22.2/30
- Network = (emptied)
- Interface = ether2
- Then click “OK”
- Then the way after that is to add IP to LAN interfaces, fill in the fields like this:
- Address = 10.22.22.1/24Leave it
- Network = (blank because it will follow the subnet above)
- Interface = ether3
- Then click OK
- The next step will result in a shared route with the gateway provided by the ISP provider, here’s how:
- “Click IP”> “ROUTES”> “+”
- Dst-address = 0.0.0.0/0
- Gateway = 192.168.22.1
- Click OK
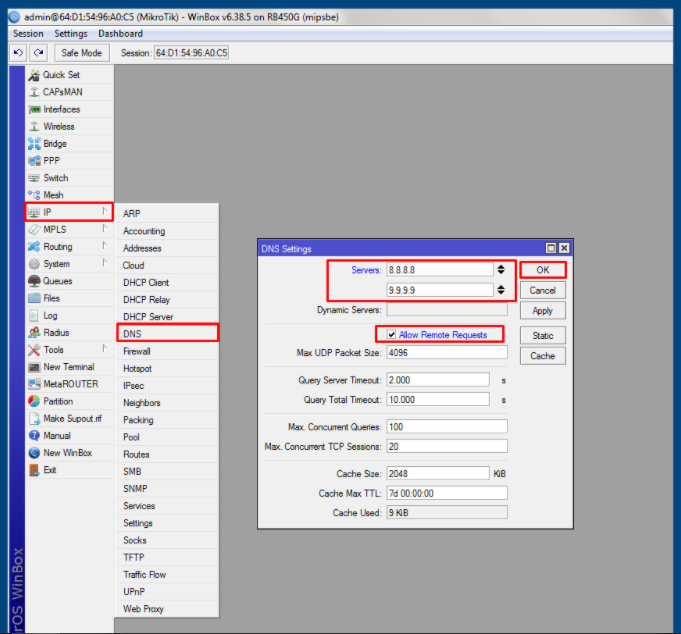
- After that, we will set the DNS server. This DNS is usually given along with the Public IP, if you have this DNS IP, please enter it in the DNS. If you don’t have the DNS IP, then we will use the Google DNS IP, namely:
- 8.8.8
- 9.9.9
After that, Check = “Allow-remote-request”, then click “OK”
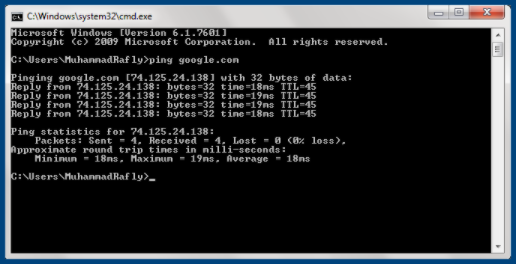
- to check the standing of the internet connection. Open New terminal then check with GOOGLE.COM PING. If a standing replay, the router has connected to the internet.
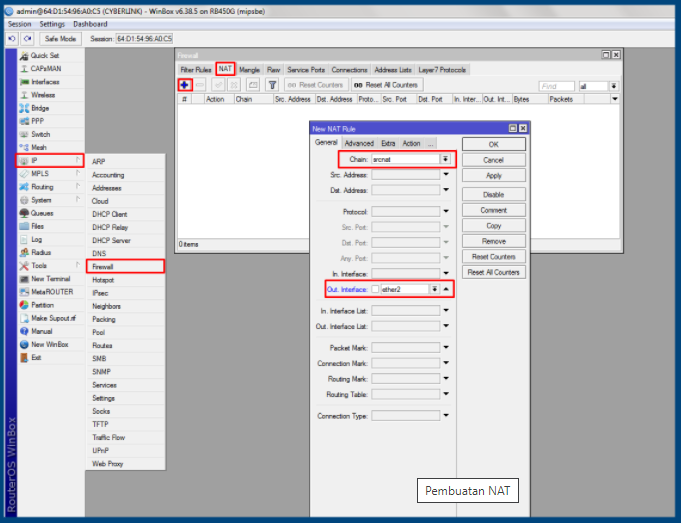
- The method after that is to cause NAT = MASQUERADE which is used so that the LOCAL IP or local place is able to connect to the internet. How as below:
- Click IP> FIREWALL> NAT> +
- General tab.
- Chain = srcnat
- Out-interface = ether2 (etherwan)
- Tab action.
- Action = Masquerade
- Then click OK
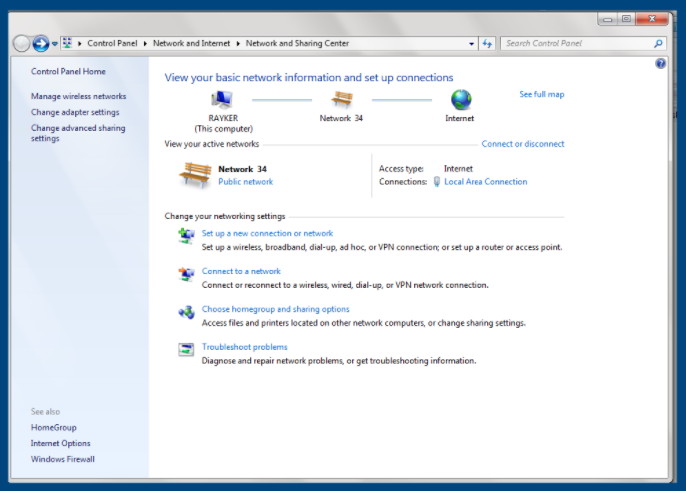
- Then the IP settings on your laptop go to the network and sharing center menu
- Click Local area connection – properties – network protocol version 4
- IP address: 10.22.22.2
- Subnet mask: 255.255.255.0
- Default gateway: 10.22.22.1
- preferred DNS server: 8.8.8.8
- alternate DNS server: 9.9.9.9
- Then click OK
- To ensure that internet is running on your laptop, then we are able to open the command prompt, how to click the windows display in the search programs box, type CMD – enter then type ping google.com if the status is replay, it shows that your laptop is connected to the internet as shown below:
Applications and Devices
When talking about Mikrotik, it is certain that the name Winbox application is very closely related. Actually what is Winbox?
Winbox is a small utility that allows MikroTik RouterOS administration using a fast and simple GUI. This is the native Win32 binary, but it can be run on Linux and MacOS (OSX) using Wine.
Winbox FunctionsWinbox
All Interface functions closely reflect console functions, which is why there is no Winbox section in the manual. Some advanced and system critical configurations are not possible from winbox, such as MAC address change in the Winbox interface change log.
- The first proxy function is to block sites that contain forbidden content to function proxies on the proxy so that it supports government programs that are positive internet usage
- Mikrotik is useful for LAN settings and configurations to enable the Mikrotik PC Router OS along with the hardware that is too low
- The Mikrotik function after that is There are internet network settings that can be fulfilled centrally in order to make it easier for admins to manage
- Can be used as a hotspot billing that simplifies configuration and part of the bandwidth of the network
- The fifth proxy function, which can be used for making PPPoE Server
- The sixth mikrotik function, which can mediate bandwidth international and local traffic The
types of Mikrotik
Mikrotik does not only exist in one kind. Mikrotik also develops two types of products, namely Mikrotik OS and RouterBoard.
Mikrotik RouterOS
Mikrotik RouterOS is a UNIX-based operating process that can make an ordinary PC that can provide features like routers, firewalls, bridges, hotspots, proxy servers and others. Because it is too easy to use, many people take advantage of this operation process to build a router network.
RouterBoard
If Mikrotik RouterOS is a software operation process, RouterBoard is actually a network hardware device developed by the Mikrotik Company. RouterBoard installed the RouterOS proxy operation process. Even though it is a hardware device, the RouterBoard is small and practical.
Tutorial on How to Setting Standard Mikrotik
Maybe you already understand how to set Mikrotik as described above. For example, the Mikrotik RB750r2. As you know, If you buy a Mikrotik Routerboard, then the license is automatically attached to the tool.
In Mikrotik settings, usually what is easy to use is to use Winbox, which can be configured with a GUI (Graphic User Interface) display.
Network Topology
In the Mikrotik settings, then you must first create a network topology. Network topology is a method or method used to connect one pc together with another PC.
The structure or network used to connect one PC together with other PCs can be shared by using a cable or wirelessly (wireless).
IP Address
In network topology, there is definitely such a thing as an IP address. In the Mikrotik settings, there is an IP Gateway and also a Public IP.
An IP gateway to the internet is a Public IP which is given from the ISP. Usually an institution will get a Public IP, if you use an internet packet without using a Public IP, then you have to configure it as a Client, this DHCP client is different.
Internet Gateway Mikrotik settings
Gateway is a part of network hardware used in telecommunications for telecommunication networks where it is possible for information to flow from one separate network to another.
Gateways are not the same as those of routers or switches because they communicate using more than one protocol to connect a group of networks and can operate on any of the seven open process interconnection (OSI) types.
NAT – Network Address Translation
In proxy, this need can be overcome together by means of port forwarding to enable the NAT feature. So that bandwidth can be managed and firewall filtering can be done, we place the server under the Mikrotik router. This means that the server is on the local network.
What is Winbox and How to Use It
In configuring a router, you can use several methods, namely using SSH, Telnet, serial console, and can include using a browser (webfig). But Mikrotik has a special application that is free and too practical that uses a GUI, namely Winbox.
Winbox is a small application that can be used to carry out administration of Mikrotik RouterOS together quickly and together with a GUI display. For more details about Winbox you can read here.
What are the tips for using WInbox?
- Remote Router MAC Address and IP Address
Mikrotik can remotely use MAC-Address and IP-Address.
- Safe Mode Features
Configuration is often done accidentally or because you try a feature so you make a wrong setting that causes Winbox to break and the router cannot be accessed.
- Hide Password A
feature that is active by default, where this feature will hide the original character entered as a password for some configurations, such as passwords for PPP Secret, Wireless Security Profile and Hotspot User.
- Dashboard
Winbox dashboard can be used to display some information, namely Time, Date, CPU load, memory, and Uptime.
- Column in WinboxWinbox
In appearance – the appearance of the window that is available by default only displays a little info. If you want to display other information you can click the small box like a down arrow, below the find box. then “Show Columns.
- Open and Close Parameters.
In executing the configuration, we often flip through the available parameters to impact a certain rule, but sometimes forget to close parameters that are not used. So if a parameter is not used, you should not delete it manually. , but closed by clicking the small arrow signal on the right.
- Winbox Loader version Winbox
application turns out to have a different version. The most recent version when this article was created is v3.11. You can watch the following version of the top of the Winbox application before doing the remote. To get the latest version of Winbox, you can go to the Tools menu> Check for Updates.
- File Management
In the past, uploading and downloading files to the router for OS other than Windows, you have to use FTP software. Currently using the new Winbox, an upload button is available if you want. add files into the router .To retrieve files from the Router, it can be done by selecting the file then right-clicking download.
- How to Backup List
Winbox Loader can also do remote Router data storage for both IP Address, Username and Password.
You do this by pressing the Add / Set button before clicking the Connect button when doing the remote router. When you have a lot of router lists in the winbox loader, if you want to move your laptop or PC, you can export and import the list that is already available in the winbox loader laptop / PC before.
- Master Password
When you have many List Routers in a winbox loader, be careful if your laptop is used by other people, you should do a “Set Master Password” to maintain the winbox loader list on your laptop.
How to Mikrotik settings with Winbox First make
- sure the source of an internet connection. whether from an ADSL modem, or a Hotspot
- First of all, as usual, look for your router board in the Winbox that you have connected to your PC
- Add IP> Addresses
- After that fill in the IP addresses as you want
- After that, set to wireless> Security profile then click +
- After that Enter the id and password
- Still in the same choice Wireless> Wifi Interfaces
- Find where your wifi is, after meeting it, then connect
- If all the settings are complete then ok
- If a sign like this appears “R” means it is connected
- Next go to IP> DHCP Client> then click the + sign
- then point to the interface to wlan1, then ok
- Wait until the status is bound if there is already bound it means you are connected
- Then we go to IP> DNS> Allow Remote Request after that ok
- Then IP> Firewall> NAT> +
- Action then select action masquerade Then ok
- For a moment leave Winbox to change adapter settings then right click on Ethernet then Properties
- Then click 2 times internet Protocol 4 Then fill in the IP address and fill in the dns then ok
- Then we return to our Winbox New Terminal then we test ping google.com
- Then also test in CMD if the reply means it’s finished
Change the Interface Name on Mikrotik
- On the main page of Mikrotik, click the interfaces menu
- Then double click the interface to be renamed.On
- the interfaces configuration page, write the name or word in the name column as you wish, if you click OK it will be saved and change the interface name
Adding the WAN Address List in Mikrotik settings
- Click the IP menu, then click Addresses and click the plus sign “+”
- Address Section: contents 192.168.22.2/30 (for example)
- Network Section: just leave
- the Interface Section: fill in ether 2
- Please click the OK menu
Add LAN Address List in Mikrotik settings
- Click the IP menu, then click Addresses and click plus sign “+”
- Section Address: fill in 10.22.22.1/24 (for example)
- Network Section: just leave blank
- Section Interface: fill in ether 3
- Please click the OK menu.
Creating a Route in Mikrotik
- Please click the IP menu, select the routes menu and click the menu and sign and “+”
- Please fill in the dst-address together with 0.0.0.0/0
- Please fill in the gateway together with 192.168.22.1
- Then click the OK menu
DNS Server Mikrotik settings
To carry out the DNS server settings on the proxy. DNS itself mostly has existed and been given since you got the public IP from the ISP. If you already have DNS knowledge, feel free to use it against the DNS menu in Mikrotik. But unless you don’t have one, then the alternative is to use:
- 8.8.8
- 9.9.9
Testing Internet Mikrotik settings
Please open a new terminal to prove the condition of the internet connection. Then ping Google or other website. If you see the reply info on the terminal display, it means that it is connected to the internet network.
Mikrotik NAT Masquerade
settings in Mikrotik NAT settings in Mikrotik have the goal of connecting a local IP with the internet.


Mikrotik settings IP LAN Address for Laptop or PC
To set LAN IP Address for a laptop or PC, you can follow the steps below:
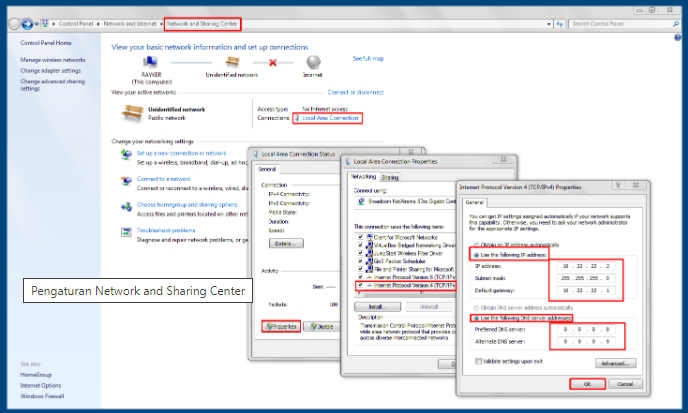
- Click LAN, define properties and specify network protocol version 4
- Enter IP address 10.22.22.2
- Fill in the subnet mask 255.255. 255.0
- Fill in the default gateway 10.22.22.1
- Enter preferred DNS server 8.8.8.8
- Enter the alternate DNS server: 9.9.9.9
- Then click the OK menu.
If your internet display is like this, then it is connected
Get interesting offers for Mikrotik products here.
![]()
