

The internet was once a luxury. But now the internet has become mandatory for everyone.
With the internet, we can enter the virtual world which provides us with various information and media from computer networks that are connected to one another.
Not only that, we can also find the internet easily, almost in all public places we can find a wifi signal that allows us to connect to the internet at any time.
Talking about the wifi signal for surfing, of course it cannot be separated from the network device that processes the wifi signal so that users can connect to the internet.
This network device is a router, this router functions in the process of sending data packets with a computer network from one device to another.
As for the router that is famous for its name, namely Mikrotik, Mikrotik is famous for its best router products in its class.
In Mikrotik we will be given several features such as software that can set up or configure a Mikrotik router, namely Winbox.
Table of Contents
Winbox Indonesia
In this article, we will discuss about Winbox Indonesia which we generally encounter in the Mikrotik package. Here’s the full review. To see how to reset Mikrotik with Winbox, you can read it here.
Understanding Winbox
Understanding Winbox is software that is used to administer Mikrotik RouterOS easily, quickly, and is supported by a GUI display.
The Winbox platform supports Linux, MacOS and Windows operating systems. You can also use this Winbox to perform Web-based Mikrotik administration.
You can get this Winbox loader for free on the website as well as find Webbox.
Download the Winbox application
If you have downloaded the Winbox application, you can immediately search for the Mikrotik IP or mac address on the network.
The following is an explanation of the function of each button on the Winbox:
- Simple Mode
Buttons / check-boxes
- Connect : buttons to connect to the router.
- Connect To RoMON : connection to an active Romon.
- Add / set : manage the IP / MAC address of the router that was previously configured in the tab Manage
- Open In New Window : opens a new window without closing the Winbox page.
Field
- Connect To: Connect to destination IP router based on IP and MAC address
- Login : input username
- Password : input password
- Keep Password : if checked then Winbox will save your authentication
- On the Advanced Menu:
Button / Check Box
- Browse : button to searchdirectory
- Keep Password : checked the app will save your authentication.
- Secure mode : if checked then you will be in the encryption menu
- Autosave session : automatically save the configuration session
Fields:
- Session : to save the configuration session.
- Note : provide notes.
- Group : A router grouping if you manage multiple routers.
- RoMON Agent : Select the entered Romon.
Winbox Functions Explain the functions of Winbox
buttons and text :
- Neighbors : these buttons are used to find and show MNDP (Mikrotik Neighborhood Discovery Protocol) or CDP (Cisco Discovery Protocol) devices.
- Managed : button used to display the entries that have been saved.
- Set Master Password : to create a password used to generate entries in the Managed window.
- Connect : button connect to RouterOS
- Add / Set : Used to save or change addresses, logins, passwords, notes, sessions and groups. The saved entries will be displayed in the Managed window.
- Tools : Used to perform various functions, such as importing addresses from a WBX file or exporting to a WBX file, moving session folders and checking for updates.
- Connect To : Destination IP or MAC Address router.
- Login : Username for authentication.
- Password : Password for authentication.
- Session : To change the session name and display saved sessions.
- Browse .. : To search for and open sessions that have been saved in .view format.
- Note : a record that will be saved in the list.
- Group : create groups and organize Entries into specific groups
- Keep Password: If checked then the password will be saved.
- Secure Mode : If checked then Winbox will use TLS encryption to secure the session.
- Autosave Session : If checked then Winbox will automatically save the session.
- Open in New Window : If checked then Winbox will open a session in a new window after pressing Connect.
How to use Winbox
To use Winbox, you really need to know the procedure first, here is how to use Winbox step by step.
- First we have to make sure the computer is connected to RouterOS using an ethernet cable or at least connected through the same hub or switch.
- Run Winbox then click Neighbors, the goal is that Winbox can find the IP address and MAC address of MikroTik RouterOS which is connected to your network by broadcast.
- If you have determined which RouterOS you want to configure, enter and click connect> enter the user login and password to access the router.
- Then Winbox will download the plugin from the router. If this is the first time Winbox will download all the plugins which will take a while.
- When the plugin download process is complete, the Winbox main window will be displayed.
Tips: MAC Address works at layer 2 so you will access to RouterOS without you having to configure the IP Address. But MAC addresses are not stable enough to be used consistently. MAC Address should be used only at the beginning of the configuration.
How to Complete Mikrotik Settings with Winbox
As for how to set Mikrotik with complete Winbox, you can follow the method below:
- First, connect port 2 to the Mikrotik modem, and port 3 to your computer. Run Winbox> Neighbors tab.
In the Winbox application, you need to fill in the following fields:
- Connect To = MAC address.
- Login = admin.
- Password = blank.
- Connect
If you are successful in entering, you can see the interface of Mikrotik Winbox, on the left sidebar is a list that functions as a confit wizard to manual.
- After you enter the proxy interface, first we will start by changing the name of the interface in order not to make it difficult for you to find which port for which.
- First click the interface button, namely the list interface.
- Double click on the interface to be renamed and then rename “Ethernet 2” (WAN) this is the link to the ISP / Modem.
- Then on “Ethernet 3” (LAN).
See the example in the image below:

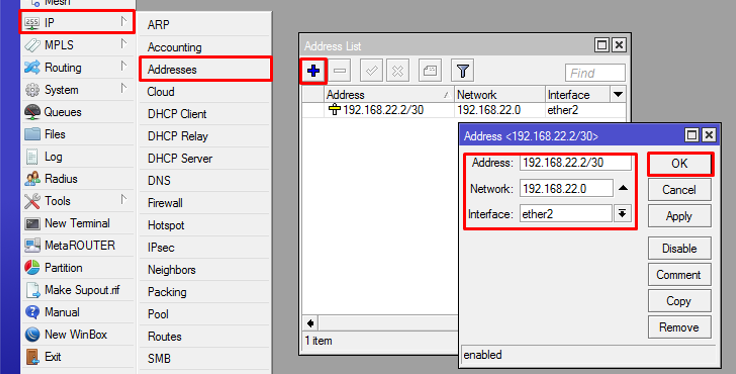
- Then we assign IP to each Ethernet.
- Click IP> address> “+”
- Address: 192.168.22.2/30
- Network: (emptied)
- Interface: ether2
- Then click “OK”
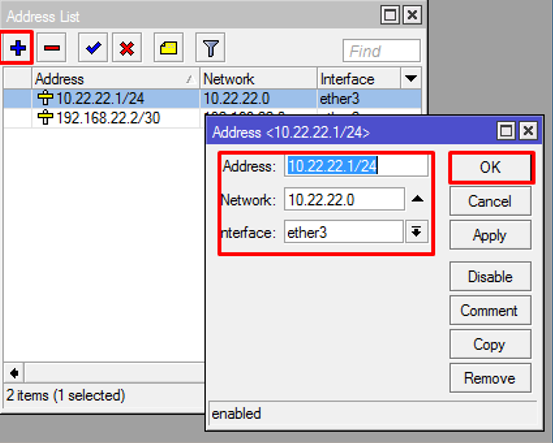
- If so then we have to provide IP on the LAN interface as follows:
- Address: 10.22.22.1/24
- Network : (just empty)
- Interface: ether3
- Then click OK
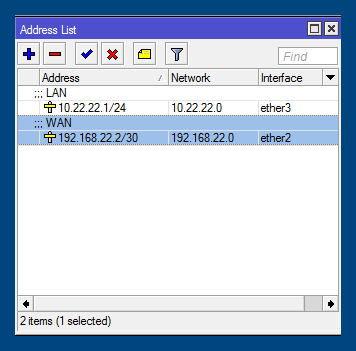
Follow as shown below:
In order to make it easier for us to see the settings we made You can add comments to each IP address by “right click”> “comment”> “Click OK”
- Kemudian kita akan membuat route dengan gateway yang diberikan oleh provider ISP, berikut caranya:
- “Klik IP” > “ROUTES” > “+”
- Dst-address : 0.0.0.0/0
- Gateway : 192.168.22.1
- Klik OK
NOTE: if the status AS then the settings are correct, but if the status is S it means that something went wrong in making the ip address or at the specified gateway.
- If we look below we will see a window that input IP addresses.
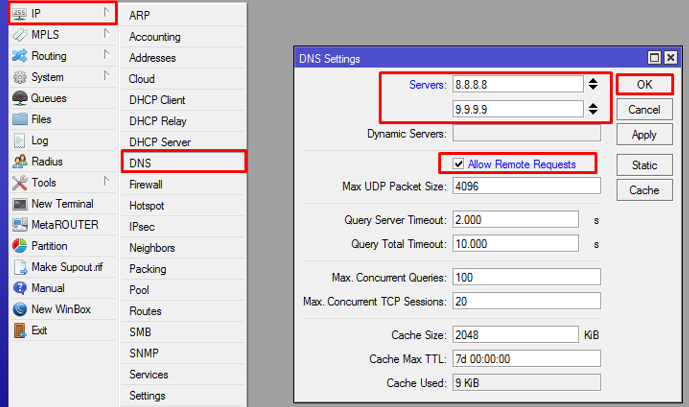
After that we can set up the DNS server if you want to set it yourself then you can use the Google DNS IP, namely:
- 8.8.8
- 9.9.9
After that, Check: Allow-remote-request> OK.
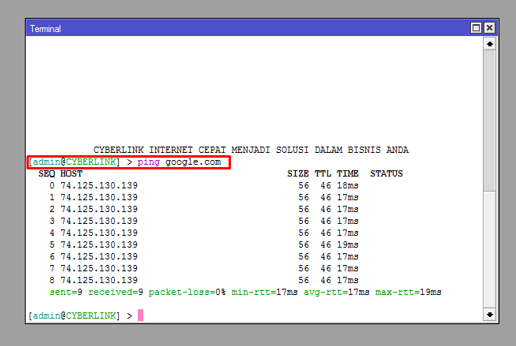
- Then we can check the internet connection by PING Google.com in New terminal.
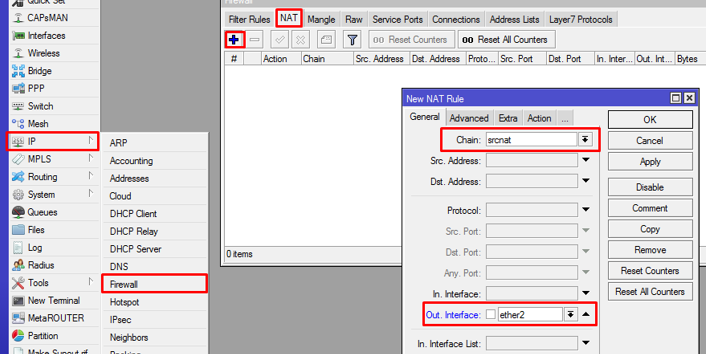
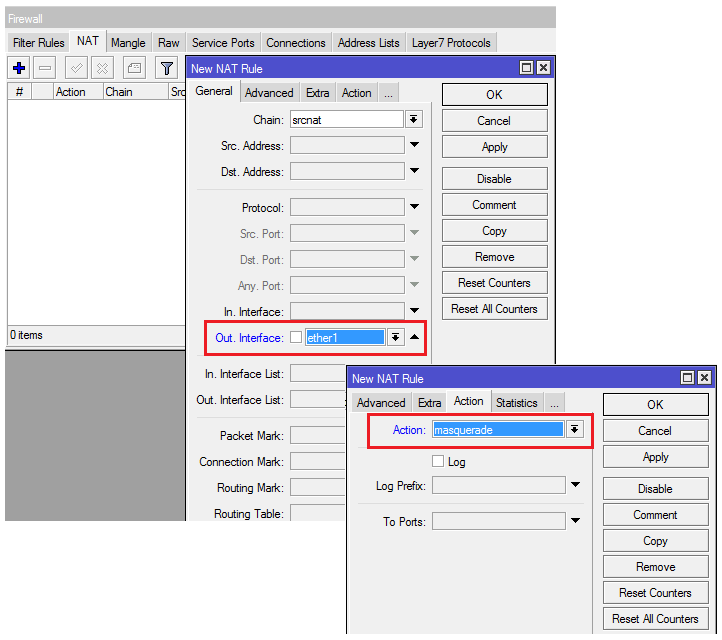
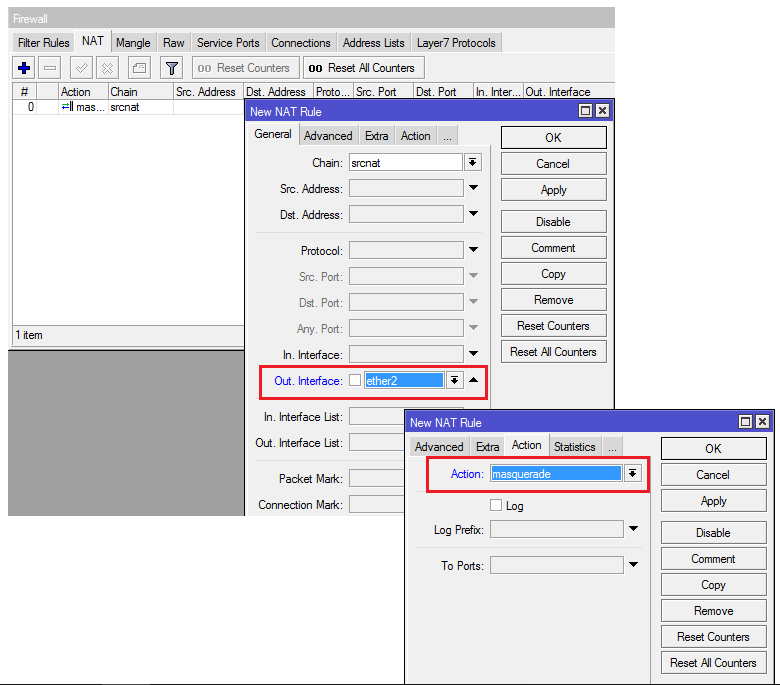
- Then we can make NAT = MASQUERADE so that Local IP can connect to the internet:
- Click IP> FIREWALL> NAT> +
- General tab.
- Chain = srcnat
- Out-interface = ether2 (etherwan)
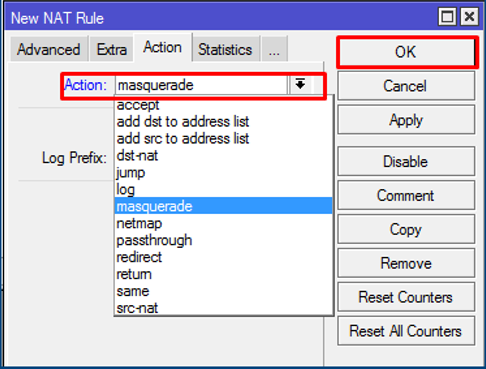
- Tab action.
- Action = Masquerade.
- Click OK.
When finished, you can see the following screen:

- The next step is to set the IP settings on your computer by going to the Network menu and sharing center.
- Click Local area connection> properties> network protocol version 4
- IP address: 10.22.22.2
- Subnet mask: 255.255.255.0
- Default gateway: 10.22.22.1
- preferred DNS server: 8.8.8.8
- alternate DNS Server: 9.9.9.9
- Click OK
- Done, you can immediately access the internet by checking it by opening a browser and opening www.google.com.
How to Setting Mikrotik Proxy With Winbox
Winbox can also set a web proxy server which is useful as an intermediary for users with a web server on the internet. Here are the steps for setting up a Mikrotik proxy with Winbox:
- Enter Winbox to the IP> Web Proxy menu.
- General tab> check “Enable” to activate the proxy.
- Fill in the proxy port for example 8080.
- Administrator cache can be changed according to your preferences.
- Cache Size determines the amount of memory allocated to store the proxy cache.
- Please check this on disk cache so that storage is carried out on the Mikrotik hard drive which is actually bigger than RAM.
- Click Apply> OK
- Then you can create a NAT to redirect HTTP data traffic (destination port 80).
- How to configure NAT Firewall by filling in the Chain = dstnat column; Protocol: tcp; Etc. Port: 80 on the General tab.
- Then the Action tab can fill in the Action: Redirect column and also the TO ports: 8080 column.
- The Mikrotik web proxy is transparent then open the IP> Web Proxy menu in Winbox.
- Go to the Status tab> Connections. If both of them are filled, the sign is that the Mikrotik proxy is running.
- To be clearer, you can check your browser connection by entering any invalid address so that an error message occurs.
- If the Mikrotik transparent proxy is already running, an error message will appear from the Mikrotik.
How to Set Mikrotik in Virtualbox with Winbox
Here’s how to set Mikrotik in virtualbox with Winbox which is easy to configure via GUI:
- Set the ether1 local IP address on Mikrotik via the command line.
IP address add address = 192.168.10.1/24
netmask = 255.255.255.0
network = 192.168.10.0
broadcast = 192.168.10.255
interface = ether1
- Open Network and Sharing Center on Windows operating system> Change adapters settings> Virtualbox Host-Only Network> Right click Properties> TCP / IPv4. Enter the IP Address which is still a network with Mikrotik, for example 192.168.10.100.
- Then open Winbox, enter IP Mikrotik = 192.168.10.1
Login: admin
Password: (empty)
Connect.
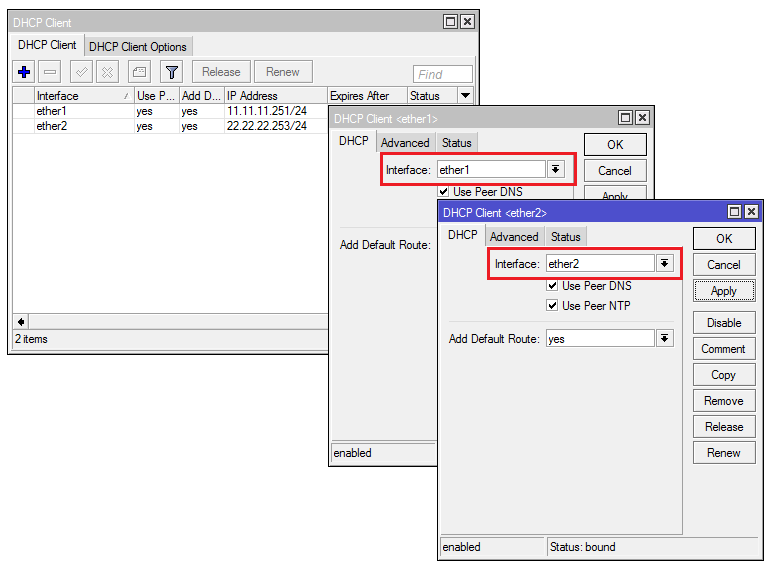
How to Divide Mikrotik Bandwidth with Winbox
Here’s a simple way to share Mikrotik bandwidth with Winbox by dividing 4 ether interfaces:
- ether1 interface: connection to the internet (DHCP client)
- ether2 interface: connection to client 1
- ether3 interface: connection to client 2
- interface eth4: connection to client 3
For each interface we plan to give bandwidth:
- Download: 4 Mb / 3 = 1333 Kb
- Upload: 1 Mb / 3 = 333 Kb
Here are the steps:
- Make sure Mikrotik is connected to the internet
- Setting the IP address for each interface connected to the client:
- ether2: 10.10.10.1/24
- ether3: 10.10.20.1/24
- ether4: 10.10.30.1/24
- Create a DHCP server on each client, enter the IP menu> DHCP Server> DHCP Setup.
- In dividing our bandwidth, go to Queues> Simple Queues> Create a new rule.
General tab.
- Name the rule
- Target: ether2 or 10.10.10.0/24
- Max limit:
- Upload Target: 333k
- Download Target: 1333k
On AdvancedTab
- LimitAt:
- Upload Target: 333k
- Download target: 1333k
To create the next rule you can use the copy button then just change the name to make it faster.
- Done, then we can test it by doing a bandwidth test on the client.
How to Setup Vpn in Mikrotik Via Winbox
Mikrotik can also be set up for VPN using Winbox, here is how to set VPN in Mikrotik via Winbox :
- First do the basic configuration:
- IP
- Settings DNS
- SettingsRoutes Settings
- Firewall
- Enable Wireless
- Next is to use VPN with PPTP server
- Enter on the PPP menu
- Select Interface
- Select PPTP
- Click Enable then Apply and OK
- Secret
then determine us the username and password for the client authentication process that will be connected to the PPTP server. It should be noted that the use of upper and lower case will have an effect.
- Select the PPP menu.
- Select the Secret
local address, which is the IP address that is attached to the router after the PPTP link is created.
Remote address is the IP address that will be given to the client after the PPTP link is established.
- Configuring PPTP Client
- Open the Open Network and Sharing Center menu> Set up a new connection or Network> Connect to a workplace> No, Create a New Connection.
- Then Use My Internet Connection (VPN)> Type the Internet Address To Connect To.
- Then enter the username and password data according to the Secret you set in the PPP secret.
- If so, there will be an authentication process and wait for it to finish.
How to Make a Mikrotik Hotspot Using Winbox
Mikrotik basically provides a hotspot menu for public and private wifi use. Where can you configure this hotspot using Winbox.
- Before configuring a hotspot, what you have to first is prepare various equipment and accessories such as a computer that can connect to a router, LAN cable, and also the router.
- If everything is connected then you have to set up IP on the router.
- Then you can add hotspots by using the menu on Winbox.
- The trick is to open the IP menu> Hotspot> hotspot setup.
- In the hotspot settings you can enter the local IP according to your wishes. > click Next.
- In the IP address range setting you fill in according to the number of devices you want to connect to Mikrotik> click Next.
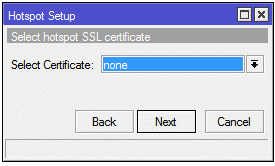
- Select the certificate none if you don’t have it> Next.
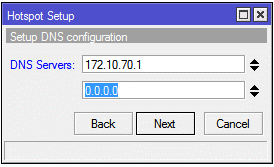
- Then in the DNS server, this is the domain name that will appear in the browser when we log in, as shown below:
![]()
At this address is the IP of the DNS server that we will set.
The address will appear when we do or click next from the previous stage.
For the name, you can add .com or .net according to your needs.
Try to use an address that does not exist.
- Click Next
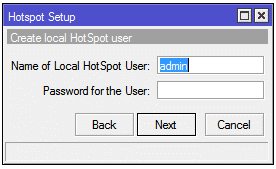
Configuration adds a login page carried out by the user, you can fill in the name freely, for example admin and free password.
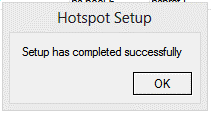
- Click Next and Success.
- The last step is setting up security as follows:
- Connect with other devices.
- Then enter your username and password> OK.
That is an example for one user, but if you want more users then you can + add the user using the users tab.
How to Make Hotspot Vouchers with Winbox
Wifi makes it easier for us to continue to be connected to the internet even though we don’t use a connection from our cellular.
But have you ever come across wifi but requires us to pay according to how many hours we use it?
Yes, this wifi uses a hotspot voucher system that can be set in a router.
This time we will discuss how to make hotspot vouchers with Winbox step by step.
This hotspot voucher can be made easy by using a user manager. Which Userman will automatically generate vouchers of any amount at the same time printing paper to the printer.
Userman provides settings and user databases that can be read and used by hotspots, so you can configure hotspots to read users on userman.
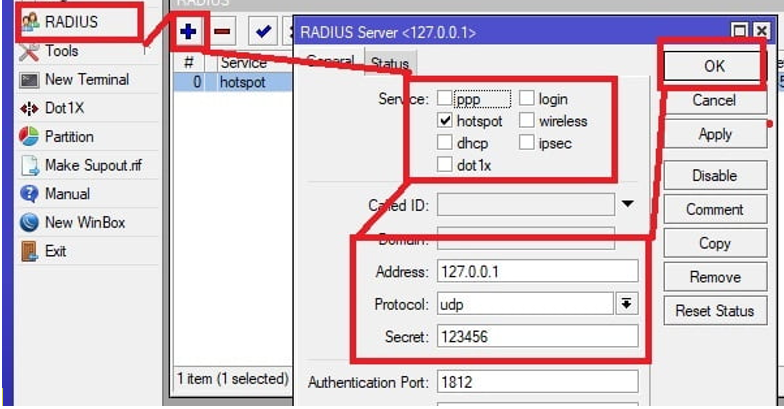
We set the radius:
- Select Menu Radius> + sign in the
- service tab = check hotspot.
- Address: 127.0.0.1
- Protocol: udp
- Secret: fill in the free password
- Click OK
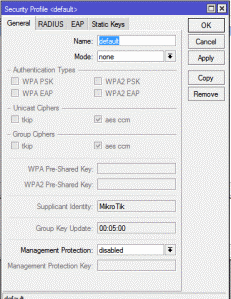
So that your hotspot can read the users contained in the Userman database then you have to change your hotspot profile settings to use radius too.
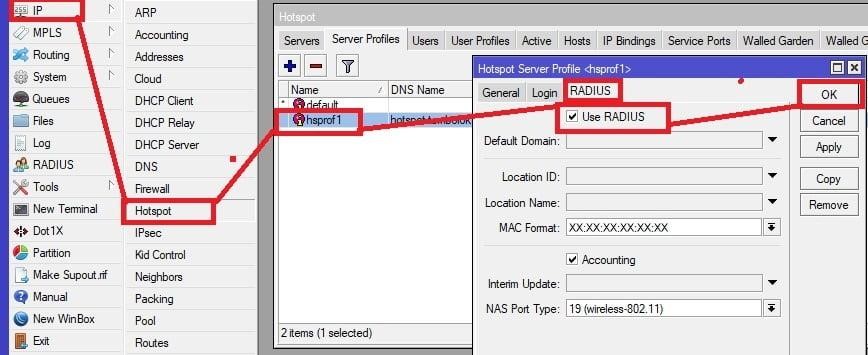
Hotspot using userman radius
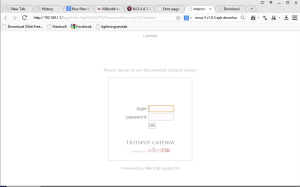
In the checking you can try logging into userman with the address http: // ip-router / userman. For example, and create a user there then try to use it to login to a hotspot.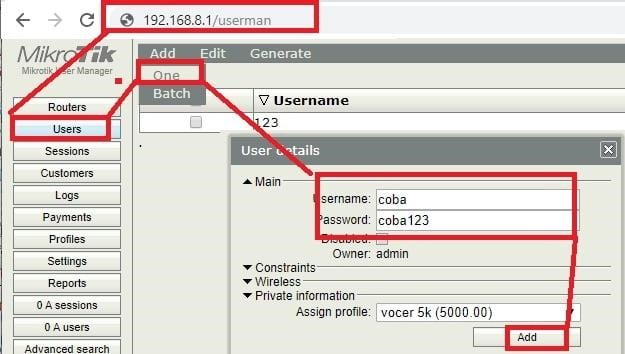
Create a hotspot user using userman.
- Login to userman http: // IP-router / userman.
- Go to the users> add> one menu.
- Fill in the username and password fields as needed.
- Click add to save.
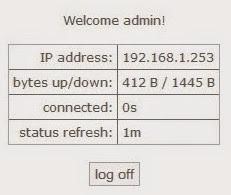
User creation is complete. You can immediately login to the hotspot with the username and password that you just created.
Other Information on Winbox
To get to know various other complete information from Winbox, there is various information that you may not know about Winbox. Winbox is a small utility that allows MikroTik RouterOS administration using a fast and simple GUI. This is the native Win32 binary, but it can be run on Linux and MacOS (OSX) using Wine.
Winbox DefaultDefault
Port WinBoxPort: Usually used in WinBox applications to log into the MikroTik router admin panel. WinBox runs on default port 8291. If the default port is changed to a custom port, it will need the exact port number to browse the admin panel. This will be a safe way to log in using IP, username and password.
Forgot Winbox Password
Forgot password maybe is something that often happens when you have an account. Winbox is no exception, you must log in to your account to access its various features.
If you forget your password, you can do this, namely by using Windows Explorer:
- First open Windows Explorer on a computer that used to log into Mikrotik using Winbox. Go to the directory C: \ Users \ (Nama_User) \ AppData \ Roaming \ Mikrotik \ Winbox. For Username, fill in your computer username.
- Then in the next folder there is a file called settings.cfg. open setting.cfg using notepad. You just need to right click then select Open With> More Apps> Notepad> Ok.
- Having the file open does seem a little complicated if you look at the script. But here you can see the username and password that used to log in to Winbox.
- So if you already know the password you can try to log into Winbox.
Mikrotik Mac Address Does Not Appear in Winbox
For this one problem, usually on your computer that you use to configure Mikrotik via Winbox, virtualization software is installed, such as virtual box, VMware and the like.
However, to fix this, you don’t need to uninstall the virtual software, but simply disable the virtual network driver on your computer. the way is as follows:
- On your computer, please go to Control Panel \ Network plus Internet \ Network Connections.
- Look for Network drivers that have virtualization software. For example, if you install a virtual box, then there is 1 virtual network driver with the name Virtualbox host only adapter that must be disabled / disabled.To disable it, right click on the virtual driver name and then specify disable, as seen in the image below:
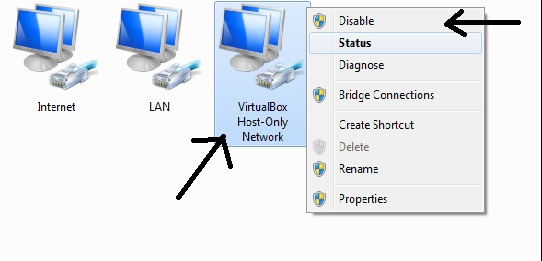
Make sure the virtual network driver is disabled or inactive.
- Please reactivate the Winbox you are using. For WinBox version 3.11, please click on the Neighbor tab to confirm that the Mac Address has been detected. If the connection is correct, then you can see a list of mac addresses as shown below:
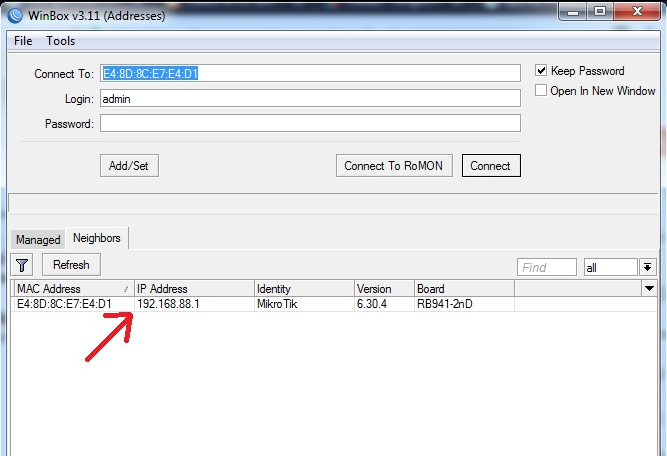
- If the Mac Address appears, you can use the mac address to log into to configure the proxy
WinboxWinbox Cannot Connect to Mikrotik
There are several things that cause Winbox Cannot connect to Mikrotik:
- Mikrotik has not been connected properly to a PC / Laptop
- If using a cable, check the UTP cable if it can still be used.
- If using Wireless, make sure the laptop is connected together with the SSID Mikrotik together properly.
- If you use a Wireless Hotspot, make sure you are LOGIN into the Mikrotik hotspot first via the website browser.
- Mikrotik Hang / Crash, so it is not detected. The solution is to try restarting the Mikrotik by unplugging and putting the power cable back in.
- The PC / Laptop used where the Virtual Adapter is installed comes from other applications, such as VirtualBox or VMWare, and other applications. Try to check the “Network plus Sharing Center” whether there are other virtual adapters installed on your PC.
Cannot enter Mikrotik through Winbox
There are several conditions that allow not being able to enter Mikrotik via Winbox, including:
- Not understanding IP addressing / subnetting techniques
Does not require the possibility that all Mikrotik router users do not understand computer networks, there are also more than one person who uses Mikrotik because necessity.
- Winbox service
port Check whether the service port on Winbox is disabled or has its port number changed, the default Winbox port is 8291.
- Take advantage of the neighbors feature
As the first step to check between the router and the PC whether it has accessed properly, usually a list of routers on the network can be seen and detected. Try to use the login using MAC Address as a login solution without having to set the IP Address.
- MAC Address Problem
Unable to log in using MAC Address, try turning off the firewall on your PC, if you still can’t try using another PC.
- Not able to login MAC Address or IP Address.
For this problem, pay attention to whether the LAN cable you are using is functioning properly, or it could be that the ether interface is weak.
- Affected by DDOS attacks
For those of you who place a public IP on the proxy WAN interface do not get such an attack, because the next DDOS attack attacks Mikrotik repeatedly, Mikrotik mostly automatically closes its login service for security reasons or other reasons.
- The Version of Winbox Version of Winbox
lastly, it’s possible that the you are using is not compatible with your proxy device, try to use the previous version or the latest version.
How to Backup Mikrotik Settings with Winbox
For how to backup Mikrotik settings with Winbox, there are 2 ways, namely by Binary and also with Text.
How to backup Mikrotik by Binary:
- Login Winbox, then click the Files
- menu. On the Files menu, click the Backup button. After that, name the backup file, check Don’t Encrypt if you don’t want to provide a password
- Drag the backup file from the list to your computer’s hard disk to save, name the file “backup_routerku.backup”.
How to backup Mikrotik by Text
- To export settings can only be done at the New Terminal command prompt.
Open New Terminal, type “export file = [filename you]”
When the proxy causes a backup of all settings “export” will consume 100% CPU this process is not long until the file exportan friends appear in the list “Files”
- Backup settings text-based it can be only in more than one particular configuration segment. For example, we wish to backup IP Address settings only, in the terminal we can type:
/ ip address export file = backup_ipaddress1 / ip address export file = backup_ipaddress
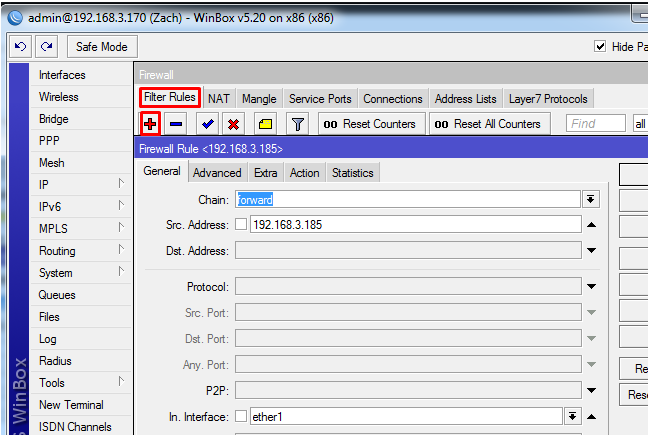
How to Block Sites in Mikrotik with Winbox
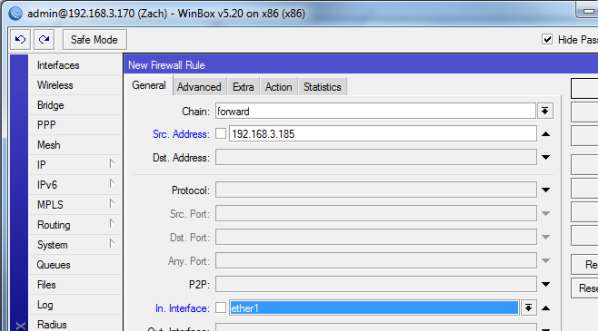
- Open proxy via winbox after that enter firewall on the IP menu, and so the firewall is
- Chainselected forward and Src. The address is filled with the IP of the object (which wants the web to be blocked), and the interface is adjusted.Then
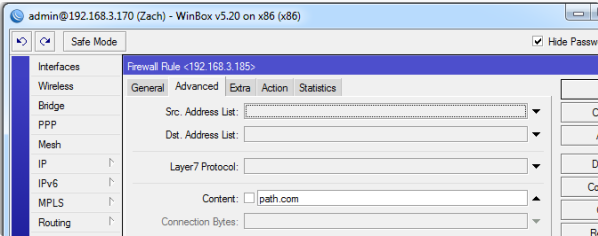
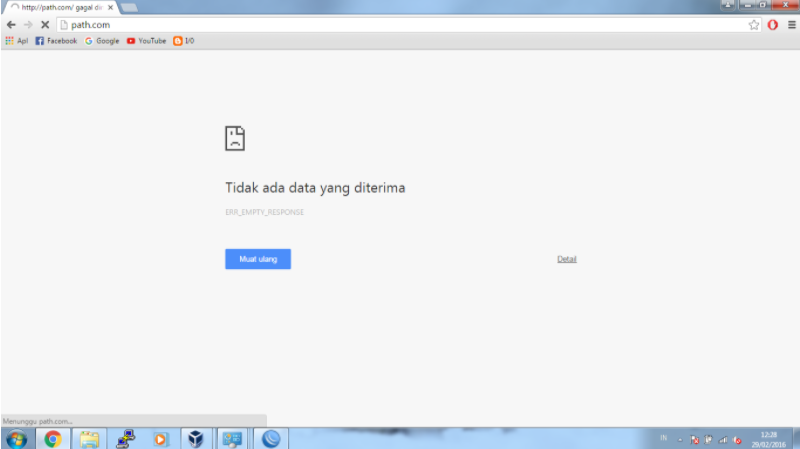
- change the Advanced tab, and fill in the content together with the site you want to block, for example, path.com
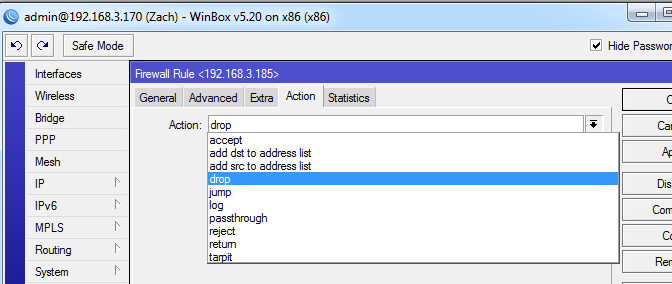
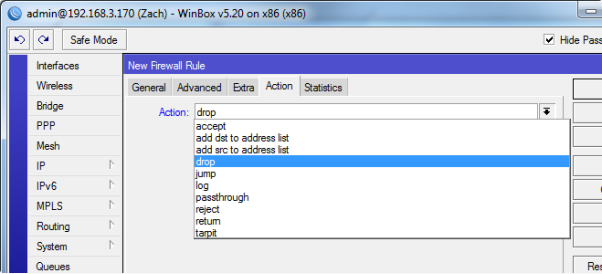
- Next to the Action tab determine together with the drop so that the packet originates from path.com is rejected / blocked
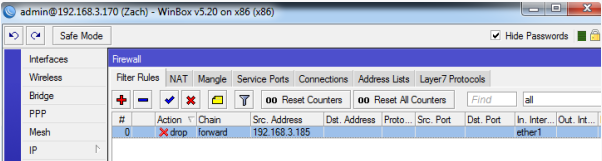
If the output is like this:
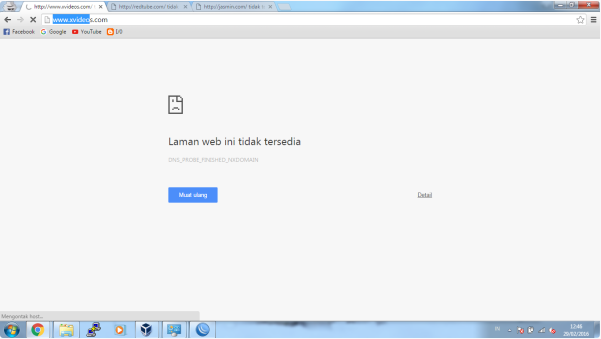
- Then open the path in the browser, and the results
- If you want to add a web that you want to block again, you have to add another filter rule, there is another easy way, namely Layer 7.
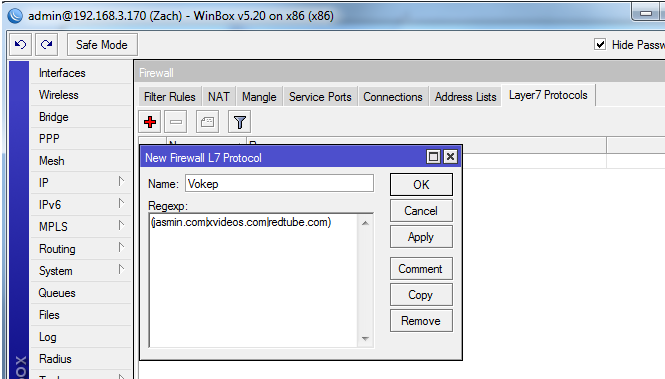
If so, click OK, the output will be like this:

- Then add the rule filter back as before
- then on the Advanced tab and L7 Protocol, was selected along L7 made previously

- and Action been Drop
If you have click OK
- So the result output like this
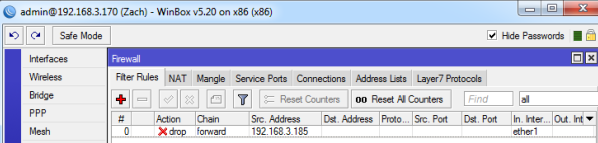
We test on web browsers that are blocked earlier
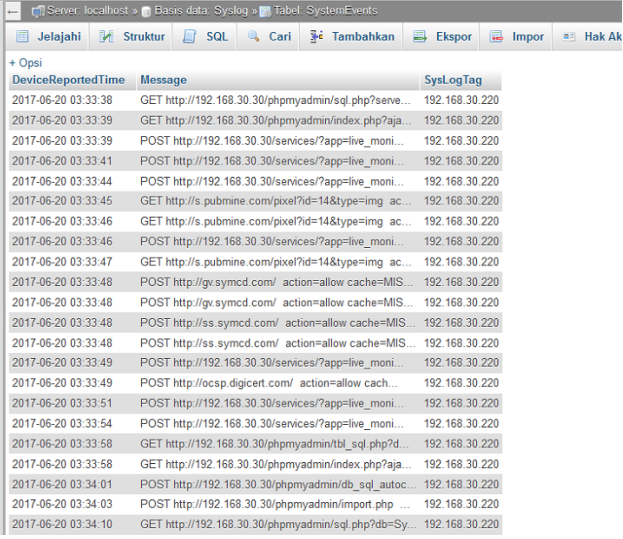
Ways Knowing the sites the client opens through Winbox
- Open Winbox, go to System> Logging, go
- to the Actions tab> Then click even New Action Log
- Enter Rules Tab> Then Add New Rules
The next step is Logging Settings onServer
DEBIAN
apt install mariadb-server
apt install rsyslog ryslog-mysql
Configure rsyslog
nano /etc/rsyslog.conf
$ ModLoad imudp
$ UDPServerRun 514
$ ModLoad imtcp
$ InputTCPServerRun 514
service ryslog restart
CENTOS
yum install rsyslog-mysqlrsyslog-*/mysql-
mysql -u root -p </
Configure rsyslog
usr/createDB.sqlnano /etc/rsyslog.conf
share/doc/$ ModLoad imudp
$ UDPServerRun 514
$ ModLoad imtcp
$ InputTCPServerRun 514
Add the following script
$ ModLoad ommysql
*. *: Ommysql: localhost, Syslog, root, [passwordDatabase]
systemctl restart rsyslog.service
firewall-cmd –permanent -zone = public –add-port = 514 / udp
firewall -cmd -permanent -zone = public -add-port = 514 / tcp
firewall-cmd -reload
- The results of the above configuration can be observed with phpmyadmin or mysql-client which you have
Combining 2 ISPs in 1 Mikrotik with Winbox
To make it easier to understand how to configure PCC on proxy first please look at the topology below:
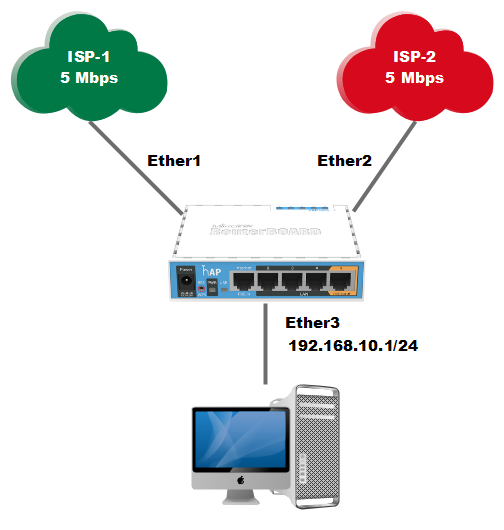
- In the picture above there are 2 ISP links, namely:
- ISP-1 (Speed 5 Mbps)
- ISP-2 (Speed 5 Mbps)
ISP-1 accesses via ether 1 to mikrotik but ISP-2 accesses via ether2.
- Request DHCP-Client from ISP-1 and ISP-2
This step has the aim of requesting an IP Address for Mikrotik from the two ISPs, see the image below:
- Request DHCP-Client from ISP-1 and ISP-2
This step has a purpose to request an IP Address for Mikrotik from the two ISPs, look at the image below:
IP > Firewall > NAT
ISP-2
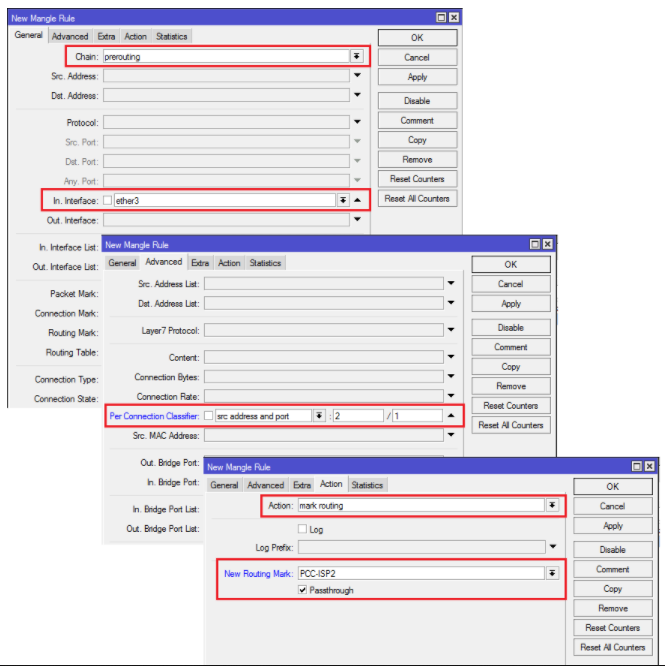
- Configuring Mangle PCC
This step has the aim to give an additional mark on each routing system contained in each ISP along with Src Address and Port groupings.
IP> Firewall> Mangle
PCC-ISP1
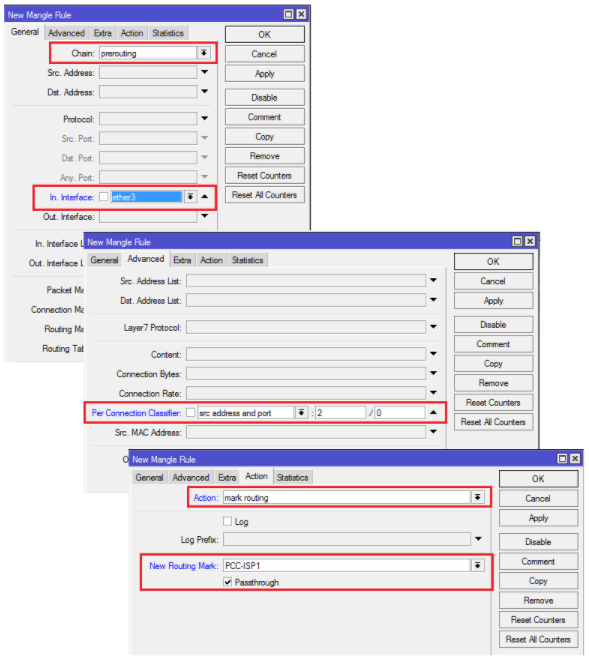
PCC-ISP2
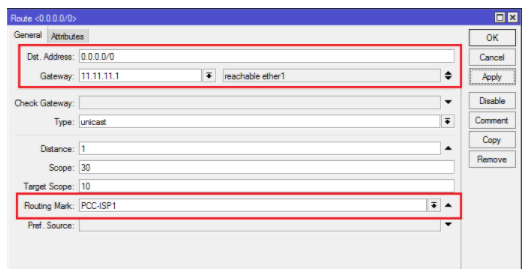
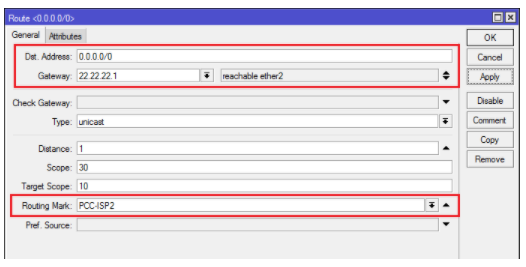
- Configure Static Route + Routing Mark
This step aims to create a default router in terms of router to the internet with gateway ISP-1 and ISP-2 and add routing marks with the PCC mangle already in make previously
IP> Routes
Default Route ISP-1
Default Route ISP-2
- Done, try doing Speedtest, if the two ISPs are working together, for example ISP 1 5 Mbps and ISP 2 5 Mbps, then the internet speed is around 10Mbps.
How to Block Port in Mikrotik with Winbox
- Open your winbox.
- Login with your username and password.
- Go to IP> Firewall.
- On the Filter Rules tab, create a new rule by pressing the “+” button.
General tab section:
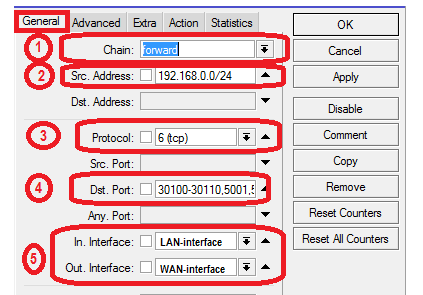
- chain: forward
- src. address: IP of your LAN network, if 192.168.1.1/24
- protocol: TCP, or UDP -> customized, most TCP
- etc. ports: ports that can be blocked. How to write ports: You can use the sign “-” from small numbers to large numbers, for example 1000-2000. You can use commas, for example 1000,1002,1009. It can also be a combination, for example 1001-1005,2005,2007.
- in. interface: your LAN interface, or the interface to the client.
- out. interface: your WAN interface, or UPLINK, or INTERNET.
Tab Actionsection

Action: Drop
The log will be checked or not free
Mikrotik DNS Settings Via WinboxWinbox
HOW 1
- Open(can be downloaded here
- connect to: [enter your mikrotik ip , (for example: 192.168.1.1)]
- login: [enter username]
- password: [enter password]
- Click the IP menu> DNS
- Uncheck the option “Allow Remote Requests”
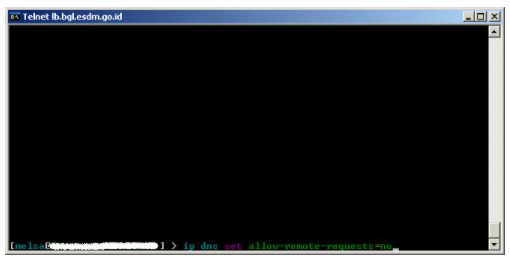
WAY 2 (VIA WINBOX)Winbox
- Still on themenu, click “New Terminal” then type the command below:
ip dns set allow-remote-requests = no
WAY 3 (VIA TELNET)
- Open the Run menu> type cmd
- Press enter, then you can see the display as below:
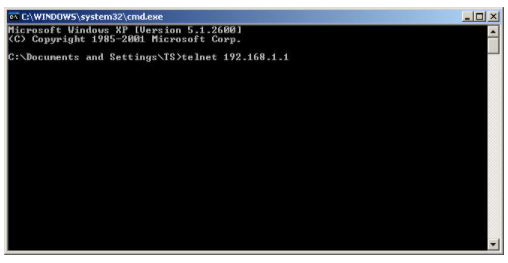
- Type – telnet [your ip router], for example as shown below
- login: [enter username]
- password: [enter password]
- Then type the command below:
ip dns set allow-remote-requests = no
- Press enter
Get interesting offers for Mikrotik products here.
![]()
