
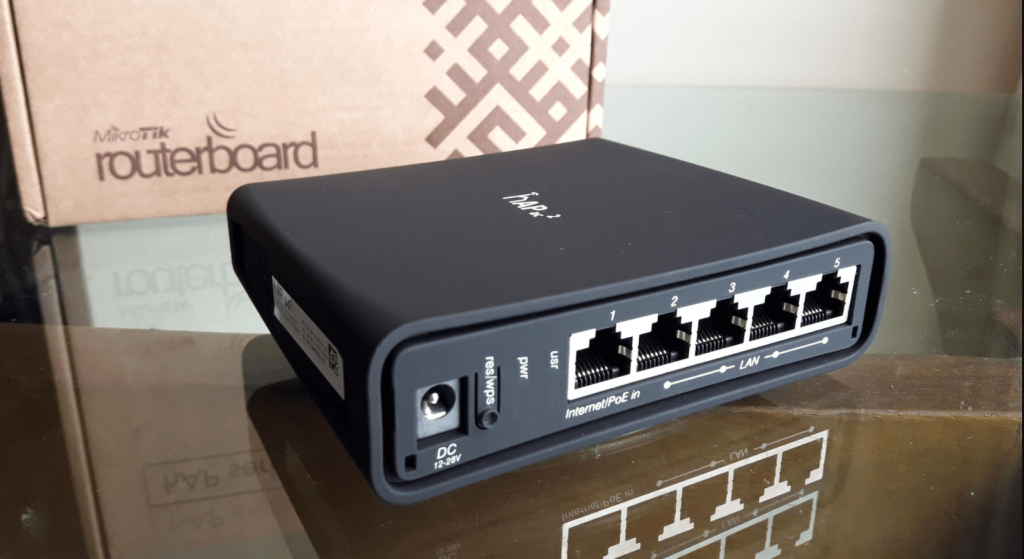
Talking about Settings Mikrotik hAP Lite , this is one of the 900 series routerboard variants.Mikrotik RB941-2ND uses a new feature in this variant, namely Micro USB 5v, Micro USB 5v can be this Routerboard using a cellphone charger or even just by using a power bank.
RB941-2ND Features:
- Processor 650Mhz
- 4 port Fast Ethernet
- Build-in Wireless 2.4Ghz (802.11b / g / n)
- Internal Dual-Chain 2 x 1.5dbi Antenna
Mikrotik hap lite RB951-2n is also equipped with an embedded access point namely Build- in Wireless 2.4Ghz (802.11b / g / n) with Internal Dual-Chain Antenna 2 x 1.5dbi.
With this specification the Hap Lite Mikrotik is able to support the needs of a small-scale wireless network.
If we use an access point on the Mikrotik hap lite, the coverage area can reach up to 30 meters without a hitch.
From this specification, the Mikrotik hap lite is suitable as a hotspot voucher on a small scale, such as a coffee shop that provides a wifi hotspot.
Check Router Products from NetData here:
Networks
Inspur
Networks
Access Point
Access Point 

Table of Contents
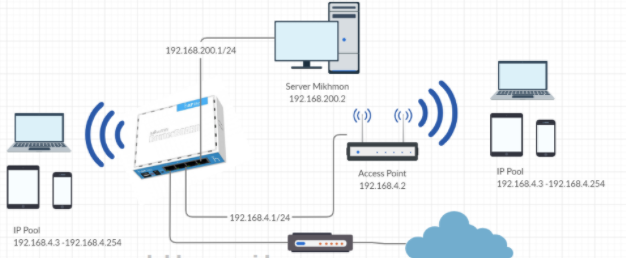
Mikrotik hAP Lite RB941-2ND Topology for Hotspot Vouchers
Configure from mikrotik rb941-2nd hap lite to be a hotspot for hotspot vouchers, roughly the following topology we will use.
- IP Pool For Hotspot> 192.168.4.3-192.168.4.254
- Mikhmon Server IP> 192.168.200.2
- Port 1 Mikrotik is connected to Modem> IP From DHCP Server Modem
- Port 2 Mikrotik is connected to Access Point external
- Port 3 Mikrotik for Access Point external
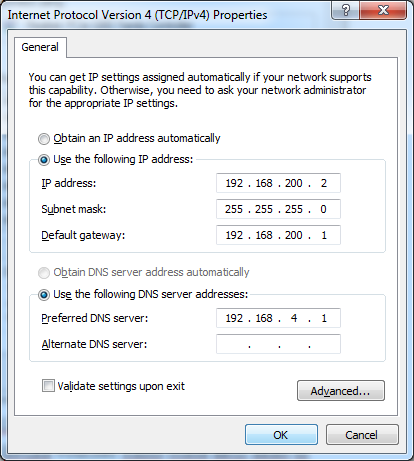
- Port 4 is connected to The Mikhmon server computer> IP 192.168.200.1/24
- Port 2, 3 Mikrotik and Wifi Mikrotik are used as aBridge.
Mikrotik hAP Lite Configuration
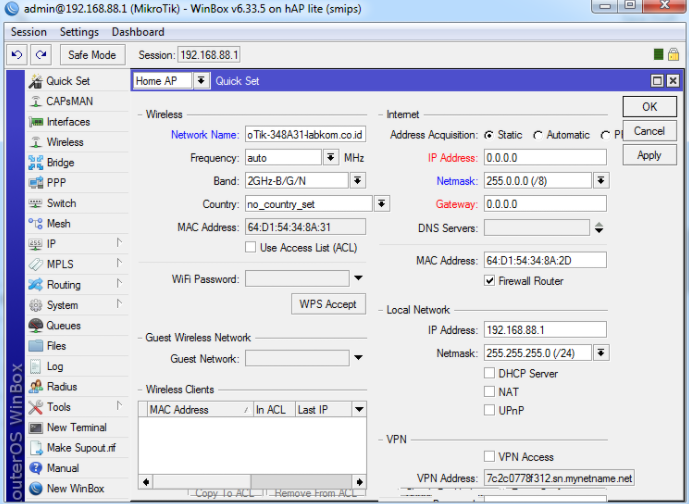
In making the Mikrotik hap lite configuration to be used as a hotspot voucher you can use two methods. Namely by using the Quick Set menu as shown below.
Here is a manual way to configure the Mikrotik hap lite settings.
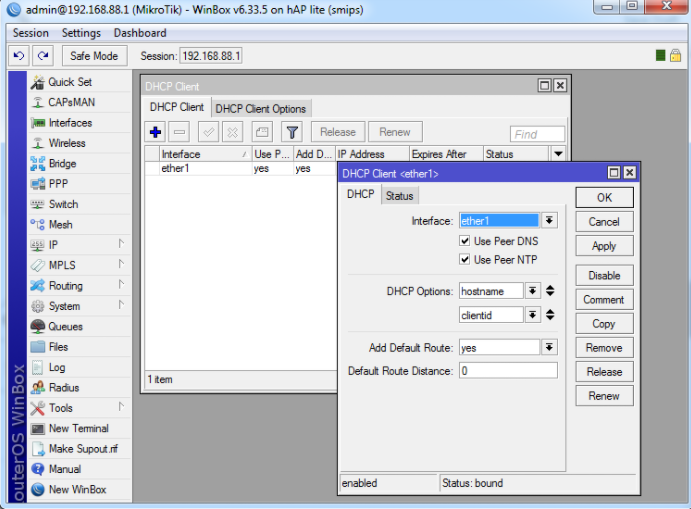
Add DHCP Client
With a modem connected to the proxy using a DHCP server so that it is easier we will use the IP client from the DHCP server modem, how to go to the IP menu> DHCP client then change the interface to ether-1.
With the IP address set for ether1 it will automatically get from the modem.
Changing the SSID for Mikrotik hAP Lite RB941-2ND
The next step is to change the SSID in the Mikrotik hap lite RB941-2ND setting by going to themenu Wireless >tab Wireless, then entering the configuration as below:
/ interface wireless
set [find default-name = wlan1] band = 2ghz-b / g / n disabled = no distance = indoors frequency = auto mode = ap-bridge ssid = Nds.id wireless-protocol = 802.11
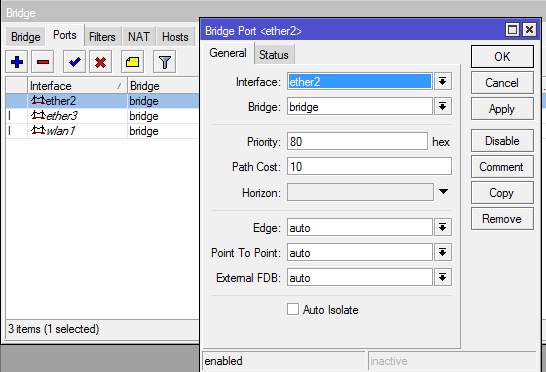
Create a new Bridge on Mikrotik hAP Lite RB941-2ND
/ interface bridge
add name = bridge
/ interface bridge port
add bridge = bridge interface = ether2
add bridge = bridge interface = wlan1
add bridge = bridge interface = ether3
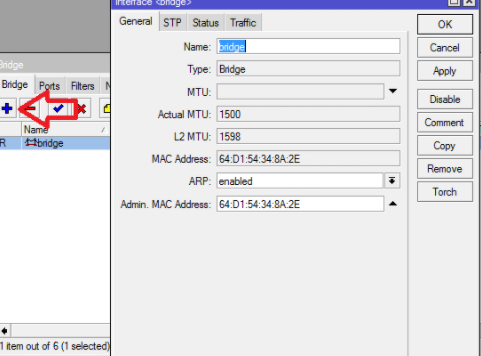
Then add Ports 2, 3 and Wlan1 to the Bride that was created previously.
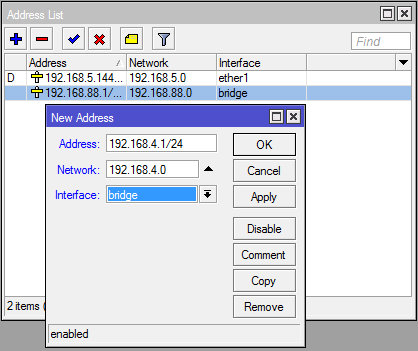
Add the IP Address for the Bridge and ether4
Add the IP address for the bridge that was created earlier by entering Address: 192.168.4.1/24 and Network 192.168.4.0.
Add the IP address for ether 4 with the parameters Address: 192.168.200.1/24 and Network 192.168.200.1.
/ ip address
add address = 192.168.4.1 / 24 interface = bridge network = 192.168.4.0
add address = 192.168.200.1 / 24 interface = ether4 network = 192.168.200.0
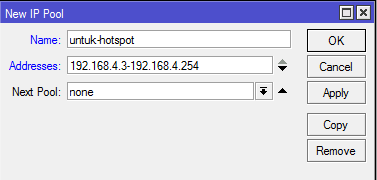
Add IP Pool
Adding a new IP Pool, how to go to themenu IP-> Pool, then fill in the name and Addresses fields with the range you specified, namely 192.168.4.3-192.168.168.4.254
/ ip pool
add name = for hotspot ranges = 192.168.4.3-192.168.4.254
Add SNTP Client
Then we have to add SNTP Client with go to the menu System -> SNTP Client, activate then add Primary NTP Client 202.65.114.202 and Secondary NTP Server 119.82.243.189.
/ system ntp client
set enabled = yes primary-ntp = 202.65.114.202 secondary-ntp = 119.82.243.189
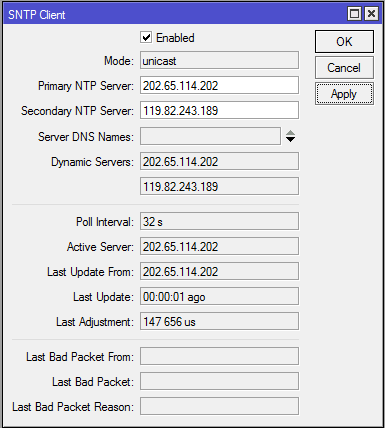
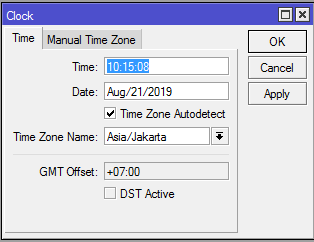
In the RouterOS system package, Mikrotik hap lite is equipped with SNTP (Simple Network Time Protocol) features Client that can be used to make the router as an NTP client.
When turned on the router will automatically synchronize the time on the added NTP server so that the time Settings Mikrotik hAP Lite will still be updated when the Mikrotik hap lite is online.
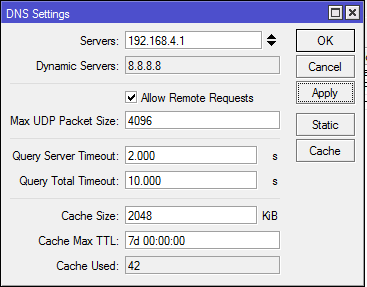
Add DNS Server
DNS server needs to be added so that the proxy IP hap lite 192.168.4.1 add this IP by entering themenu IP-> DNS, then checking the option Allow Remote Request.
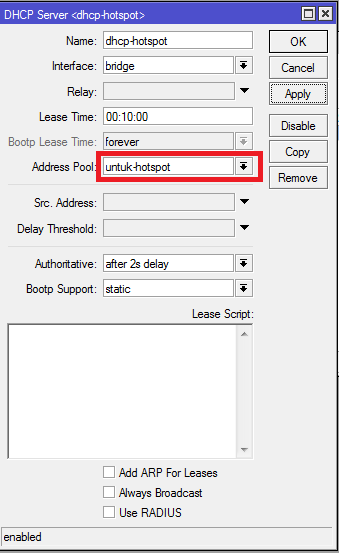
Add DHCP Server
Add a new DHCP server by going to themenu IP-> DHCP Server. Then select the bridge interface and the address pool for the hotspot that was previously created.
/ ip dhcp-server
add address-pool = for-hotspot disabled = no interface = bridge name = dhcp-hotspot
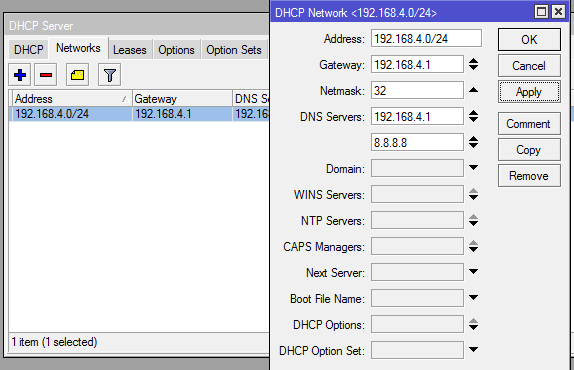
Add Networks to DHCP Server
On the DHCP server menu, then we add the Gateway and DNS server for the DHCP server that was added earlier.
Below we choose Netmask 32 to aim to avoid the netcut signal breaker application in the hotspot client.
/ ip dhcp-server network
add address = 192.168.4.0 / 24 dns-server = 192.168.4.1,8.8.8.8 gateway = 192.168.4.1 netmask = 32
Create Nat
NAT is the default firewall from the router, especially this proxy hap lite, for Settings Mikrotik hAP Lite NAT by way of out-interface = ether1 and action masquerade.
/ ip firewall nat
add action = masquerade chain = srcnat out-interface = ether1
Creating a hotspot hAP Lite RB941-2ND
Mikrotik hap lite can also be used as a hotspot server by going to themenu IP> Hotspot, then creating a first Server Profile.
Create a Server Profile
To create a server profile in the IP> Hotspot >tab Server Profile, add a new profile server with hotspot Address 192.168.4.1 and DNS Name such as hotspot.netdata. en.
Create aHotspot Server to
Configuration Create a hotspot server on the proxy hap lite by going to the IP> Hotspot >tab, Servers adding a new hotspot server.
Enter the interface parameters bridge then use the Address Pool that was created in the previous step.
Configuring the Mikhmon Server Computer IP
For the Mikhmon server, you can use Port 4 / ether4 on the proxy, along with the Static IP configuration, if you crave automatically just make a DHCP Server for Port 4.
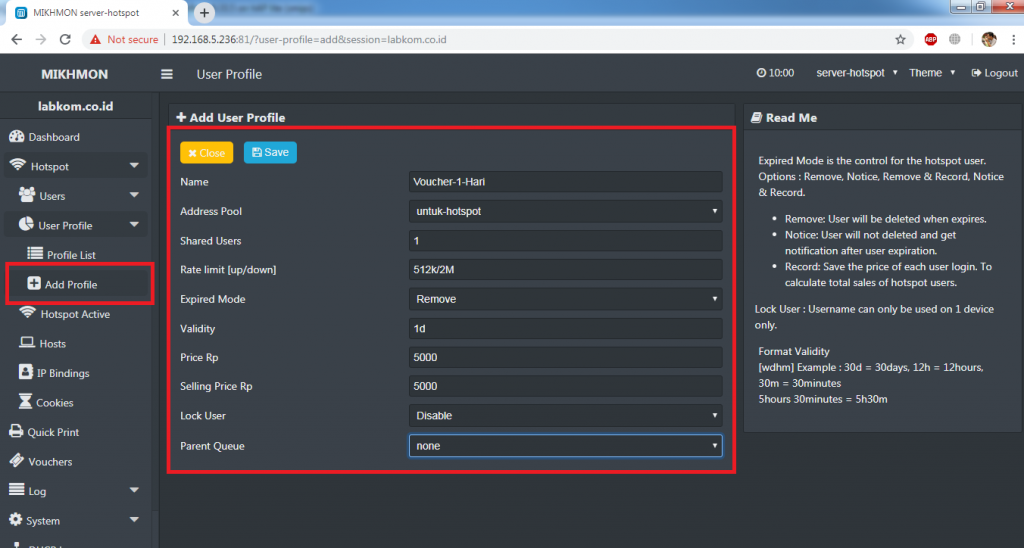
Create a User Profile on Mikhmon
In creating a user profile on Mikhmon by opening the application mikhmon and connecting to mikrotik hap lite.
If you have opened mikhmon then open the menu Hotspot> User Profile> Add Profile, for example, we will make a 1 day voucher for 5000:
- Name: 1-day voucher
- Address Pool: for hotspot (fill in the IP address pool that was previously created)
- Shared Users: 1 (Number of user devices that can log in at the same time)
- Rate Limit [up / down]: 512k / 2M (upload and download speed)
- Expired Mode: Remove (if the voucher has expired, the active period will be removed)
- Validity: 1d (voucher active period 1 day)
- Price Rp: 5000 (voucher price)
- Selling Price Rp: 5000
- Lock User: Disable (if activated / enable the voucher can not log into another device)
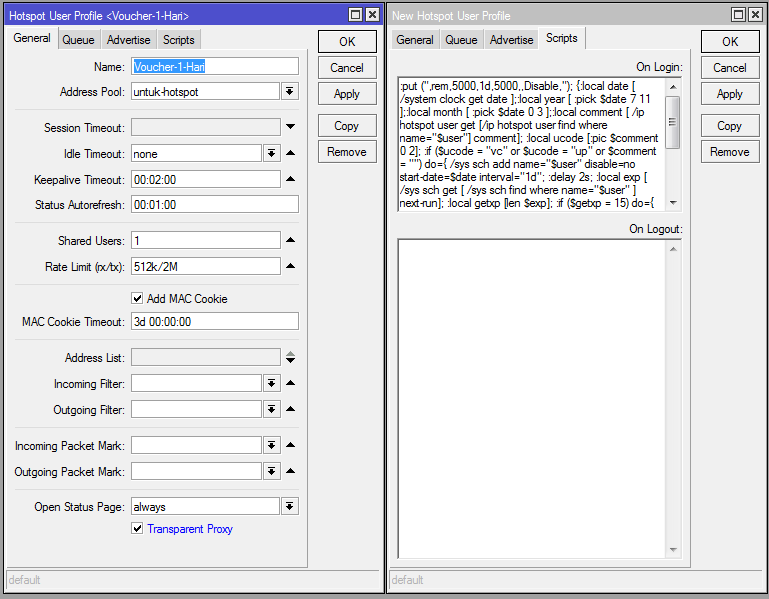
Like this, roughly the result of generating a Hotspot User Profile comes from Mikhmon, there is already a script for the 1 day voucher that Mikhmon has made.
Create / Generate Vouchers on Mikhmon
For those of you who don’t have the Mikhmon application, you can download it on the official website, which is https://laksa19.github.io. Install the Mikhmon application to use it.
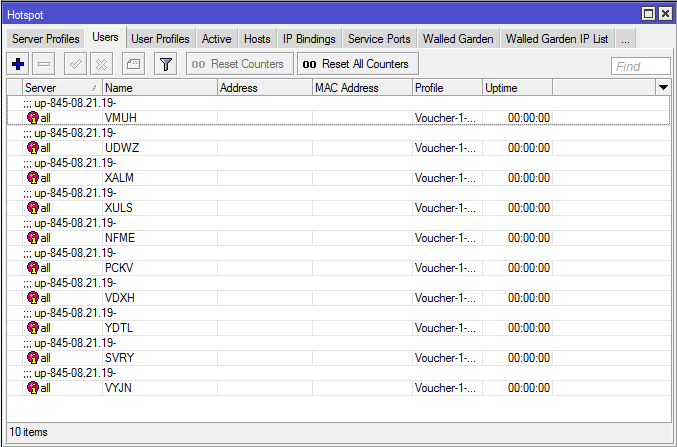
The following is an example of making unlimited vouchers for 1 day, so to create or generate vouchers on Mikhmon, by opening the Mikhmon application then entering themenu Hotspot> Users> Generate, Approximately as in the image below:
- Qty: 10 (Number of vouchers to be generated or generated)
- Server: all (the hotspot server that will be used)
- User Mode: Username & Password (if you choose a different username & password to be generated, for example Username = Password then the username and password will be the same)
- Name Length: 4 (Number of voucher characters that will be generated)
- Prefix: – (if the contents of the voucher to be created will be added with the word Prefix)
- Character: Random ABCD
- Profile: Voucher-1-day (User Profile used)
- Time Limit: – (will be added to the limit uptime or time allowed to go online)
- Data Limit: – (quota)
- Comment: – (comment)
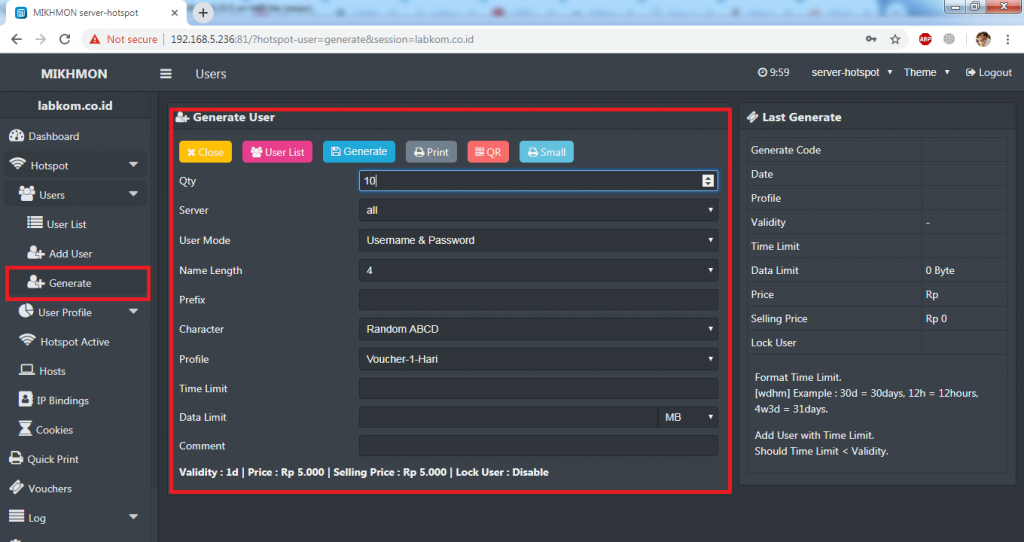
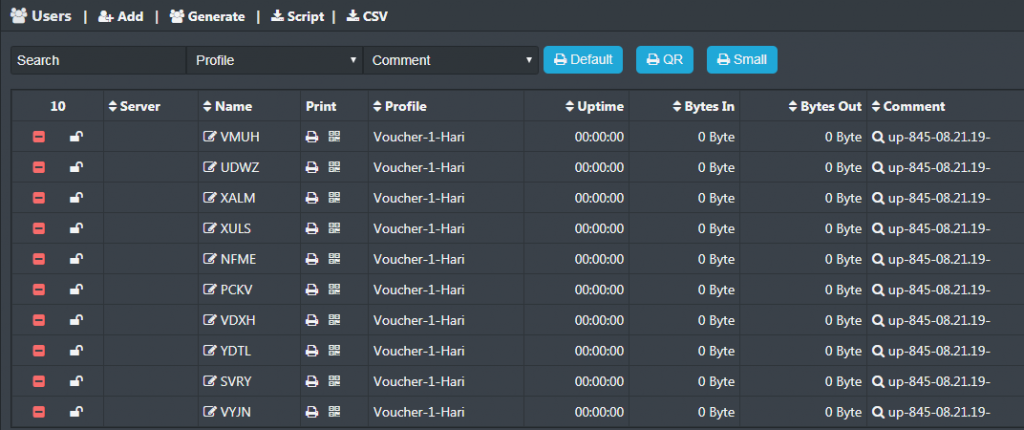
User generated results or vouchers from Mikhmon
If you want to add a new access point then you can use the Port 3 / Ether3 on mikrotik hap lite then connected to the hub or it can also be connected directly to port 3 mikrotik hap lite.
How to Reset Mikrotik hAP Lite
Mikrotik hap lite also sometimes an error occurs in its use as a hotspot voucher, so to restore it to the original you can reset the mikrotik hap lite.
As for how to reset the Mikrotik hap lite both in the MikroTik RB941-2nD hap lite, RB750, RB450, RB11000 series in the following ways:
- First you have to unplug the power cable from the mikrotik hap lite from the wall outlet.
- Prepare a pencil tip or pen tip to press and hold the RES (Reset) button.
- While pressing the Reset button, you put the Mikrotik Hap lite power cable back into the socket.
- Wait until the ACT LED hap lite mikrotik flashes, then you can remove the tip of the pencil or pen from thebutton RES.
- Mikrotik hap lite has returned to its initial configuration and is ready to be used again.
This is the tutorial on How to Settings Mikrotik hAP Lite RB941-2ND for Vouchers with Mikhmon which can be used as a reference. Thank you for reading this article and hope it is useful.
![]()
