
If you have a quality internet connection, you can get telephone service delivered through your internet connection, not from your local telephone company, this is what is commonly known as Voice Over Internet Protocol (VOIP).
Table of Contents
VOIP Is
VOIP stands for Voice Over Internet Protocol, or in a more general term telephone service over the internet.
Some people use Voice Over Internet Protocol (VOIP) in addition to their traditional phone service, because VOIP service providers usually offer lower rates than phone companies using older or traditional systems.
How Voice Over Internet Protocol Works
It takes a way to convert analog phone signals into digital signals that can be sent over the internet.
- This function can be included in the phone itself or in a separate box such as ATA. Here’s how VOIP using ATA works:
Ordinary Phone – ATA – Ethernet – Router – Internet – VOIP Service Provider
Talking about ATA, what is meant by ATA?
ATA = Analogue Terminal Adapter. Connecting Analog Telephone to the network. It usually has an Ethernet socket, and an RJ-11 telephone jack.
- VOIP can also use IP Phone. IP Phone is a page containing a brief list of VOIP Phone details including details, where to buy, specifications, and other relevant phone information.
How it works is as follows:
IP Phone – Ethernet – Router – Internet – VOIP Service Provider
- connecting VOIP directly
It is also possible to bypass the VOIP Service Provider and connect directly to another VOIP user. However, if the VOIP device is behind a NAT router, there may be a problem with this approach.
The way it works is as follows:
IP Phone – Ethernet – Router – Internet – Router – Ethernet – IP Phone
VOIP Function
Judging from the explanation of VOIP, VOIP is useful for making calls using a broadband internet connection without using a regular telephone line.
Some VOIP facilities may only allow you to call other people using the same facilities, but other facilities may allow you to call anyone who has a telephone number – including local, long distance, cellular, and international numbers.
In addition, while some VOIP features only function via your computer or a dedicated VOIP phone, other facilities allow you to use a traditional telephone connected to a VOIP adapter. Interested in VOIP network security? Check now the security services from Netdata here.
Firewall Functions in Voice Over Internet Protocol (VOIP) Networks
As is well known, all networks need security. For VOIP networks, there is a firewall that keeps the conversation data. The function of the firewall on the VOIP network is very important.
The firewall in VOIP monitors traffic by checking it at layers three and four. In other words, it examines packets and packet segments of incoming network traffic packets. This allows it to block most threats, while remaining at a level high enough to handle high volumes of traffic.
Data security is indeed very important, so it’s no wonder that there are internet service providers who provide VOIP at a slightly expensive cost, because indeed the firewall that is on its VOIP service is a very good firewall that runs well.
Voice Over Internet Protocol Equipment Needs
To be able to make calls via VOIP, there are several supporting devices needed. Some of the components that must exist are:
- Protocol
Generally, there are 2 technologies used in VOIP, namely H.323 and SIP.H323 which are technologies developed by ITU (International Telecommunication Union).
- VOIP Server
VOIP server is the heart of the VOIP network. Indeed, for some conditions, this device does not have to be on the VOIP network, but it will be needed to be able to connect various server communication points.
- VOIP Switch
The basic concept of using Circuit Switching is that a communication path will be opened and ordered during the communication. In the end, the existing communication channels become exclusive to the two points that use them.
For example, Si A lives in Jakarta and wants to call a relative in Surabaya. As long as the communication system between A and his relatives occurs, the telephone line from Jakarta to Surabaya is exclusively owned by A and his interlocutor. As a result, the cost has increased because you have to pay for the telephone line earlier.
- Codec (codec-decoder)
In order to pass the Packet Switch route together properly, VoIP requires a coder and decoder process. This process converts the audio signal into compressed (compressed) digital knowledge to be sent over the internet. At another point, knowledge is redeveloped (decompressed), and converted into an analog signal.
- SoftPhone (Software)
Apart from being a complete telephone (hardware), telephone equipment can also be a software. In the VOIP world, this device is called a SoftPhone. Softphones come in many varieties of power and license. Today many Softphones are distributed along with free licenses. It is even available that provide free software licenses as well as VOIP network services.
- VOIP Gateway
Gateway is used to connect two different networks, namely between H.323 and non-H.323 networks, for example a gateway can connect and provide communication between the H.233 terminal and the telephone network, for example: PSTN.
Advantages and Disadvantages of Voice Over Internet Protocol
In many ways, of course there are advantages and disadvantages, especially in a communication network, VOIP is no exception. Although it is predicted to be a more modern communication network without using a telephone network, there are certainly advantages and disadvantages.
Advantages of VOIP:
- Lower costs for direct long distance continuation.
- The use of smaller bandwidth than a regular telephone.
- Allows to be combined with existing local telephone networks.
- Various forms of VOIP networks can be combined into a large network.
- Take advantage of existing data network infrastructure for voice.
Disadvantages of VoIP
- Voice quality is not as clear as PSTN network.
- There is a break in communication.
- Limited regulations.
- Potential to cause network obstruction / stuck.
- Previously there was no guarantee of quality if VOIP over the Internet.
- Relatively expensive equipment.
TheVoice Over Internet Protocol configuration
VOIPdefines the steps for making tone calls over an IP network including digitizing and packetizing the voice stream. IP Telephony takes advantage of the VoIP standard to create a telephony system where high-level features such as advanced call routing, voice mail, contact centers, etc. can be taken advantage of.
How to Create a VOIP Server in Windows
In this lesson, we will discuss creating a free telephone network using an existing LAN. In this case, what is needed is a VOIP server because it uses a LAN network, as well as telephone software for use on the client.
This time we will discuss a very easy and very common way, using an asterisk. However, the Windows version is used, so it uses asteriskwin32.
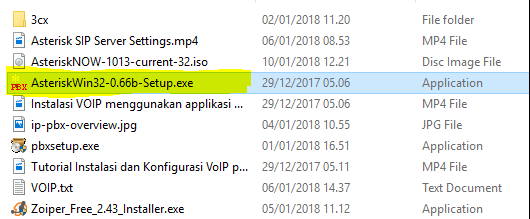
- If you don’t have the installer application, please download it on the softswitch server

- Double click the file, then a screen will appear like this


Just click the Next button,
- select I accept the agreement, then click the next
- button.In this step, you are given the option to determine the location in the softswitch server folder asteriskwin32 will be installed, then click the next button to continue with the installation.
- If your computer has already installed this softswitch, select PBX Update, but if it’s just installing then select PBX New Installation, then click the next button, and wait for the installation to complete. When it’s finished, the PBX Manager icon will appear on the windows desktop.
- The Voip server installation process (Softswitch) with asteriskwin32 is complete.
Softswitch VoIP Server Configuration
- Run the VoIP Server, Click the start button, click AsteriskWin32 GUI

- Wait until the screen below appears.

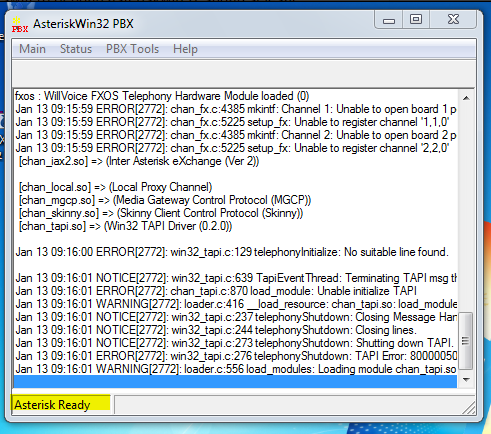
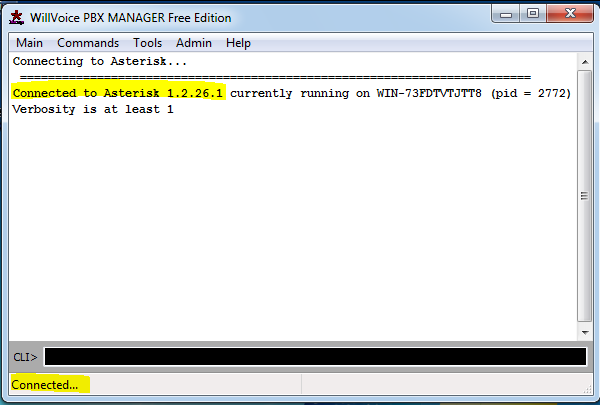
- After Asterisk Ready Status, Click PBX Manager, a screen will appear below which means the asterisk VoIP server is ready to use.
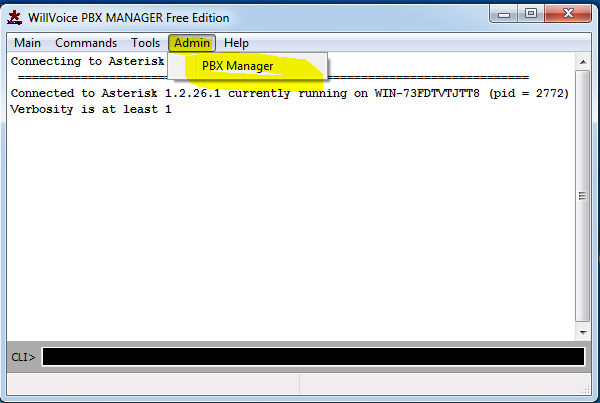
- Click Admin to configure the extension.

- A screen will appear to fill in the password.
- Fill in the password with admin, and click OK, then the following screen will appear

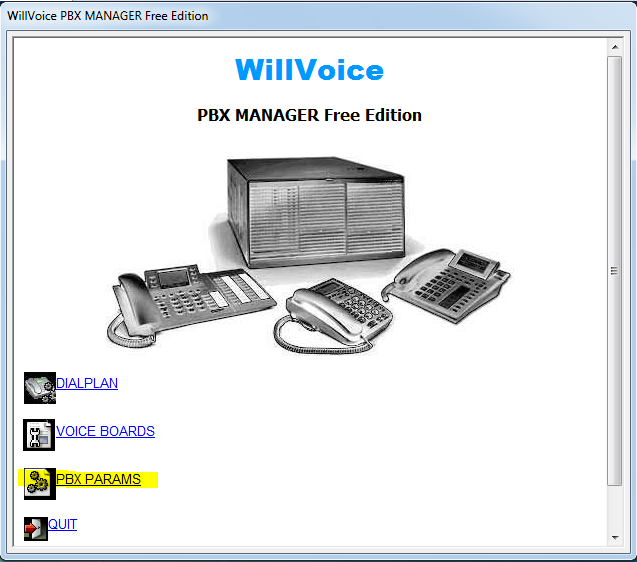
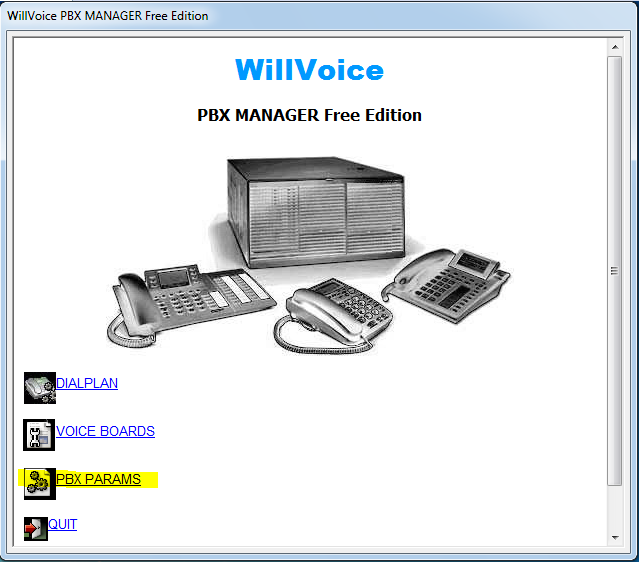
- Click PBX Params, a screen will appear below

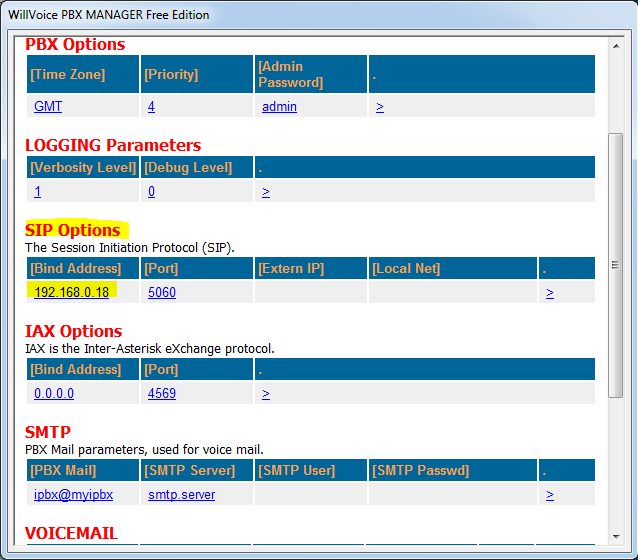
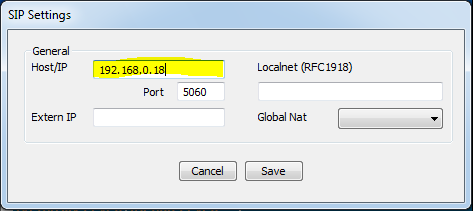
- Click SIP Option, here you have to fill in Host / IP with the IP address of the computer where the VoiP asteriskwin32 server is installed
- Here we will fill in the Host / IP with the IP address of the computer where the VoiP asteriskwin32 server is installed, fill in the port with 5060 or 5061, leave the Extern IP and Locahet blank, then click save.

- After savingwill return to the main menu of PBX PARAMS.Moduls
- , youClick PBX, to add modules required for VoIP telephone communication.
- In gruo Modules to Load, there must be a file marked with a yellow sign, if it doesn’t exist, then look for it on the left, then select it and click the load button to add it.
- Click Save, we return to the main menu
Dial Plan Configuration
- Return to the main view of PBX Admin
- Again, we select the DIAL PLAN menu, then the following display will appear:

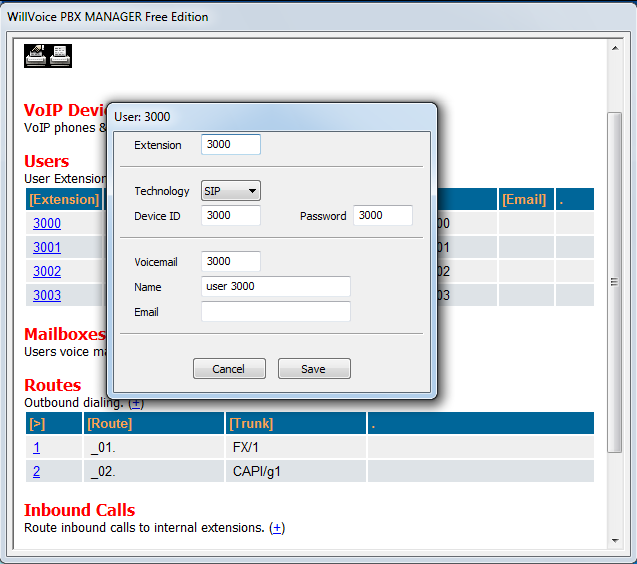
- Select or click an extension that we are going to set, for example 3000, the following display will appear this:

- Fill in the password according to our wishes, then click save.
- Do the same for the other extension configurations.
- When finished configuring the extension, we will return to the main menu.

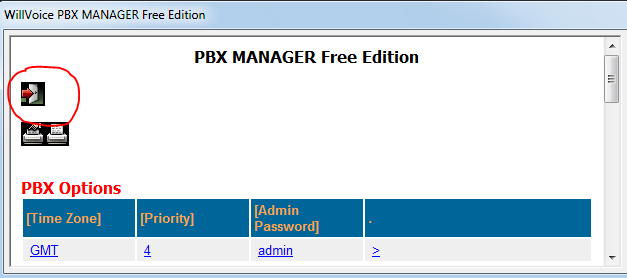
- At this point the server configuration is complete, you return to the main menu by clicking the button circled in red.

- Click the QUIT button, then we will restart the server.

- Select the DIAL PLAN menu, then choose or click on one of the extensions that we will set, for example 3000.
- Fill in the password according to your wishes, then click save.
- Do the same for the other extension configurations.
- After finishing configuring the extension, we return to the main menu
- until here the server configuration is complete, return to the main menu by clicking the button circled in red.
- Click the QUIT button, then we will restart the server.
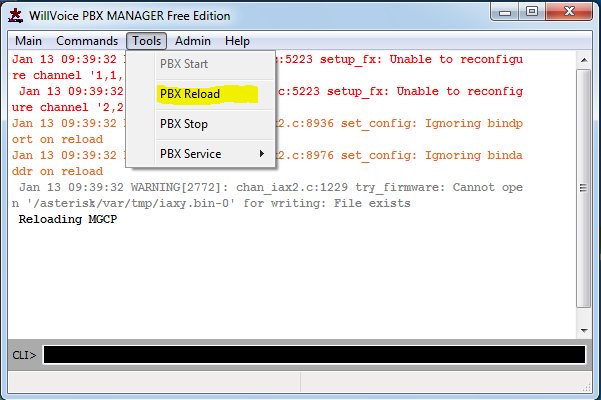
- Click Menu Tools -> PBX Reload, to restart the VoIP server, so that the server configuration we have done is running.

VOIP Configuration in Cisco
Here we will practice how to configure VOIP in Cisco using Packet Tracer with a topology example as below:
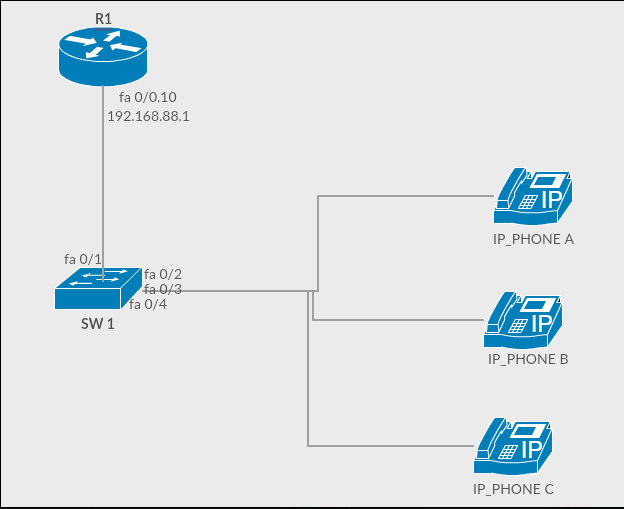
- Configure IP Address on R1:
R1>enable
R1#configure terminal
R1(config)#int fa0/0
R1(config-if)#no sh
R1(config-if)#int fa 0/0.10
R1(config-subif)#encapsulation dot1q 10
R1(config-subif)#ip address 192.168.88.1 255.255.255.0
int fa 0/0.10 : membuat sub interface dibawah fa 0/0
encapsulation dot1q 10 : menjadikan interface fa 0/0.10 menjadi interface VLAN dalam hal ini Vlan 10
- Configure DHCP on R1:
R1(config-subif)#ip dhcp pool untukvoip
R1(dhcp-config)#network 192.168.88.0 255.255.255.0
R1(dhcp-config)#default-router 192.168.88.1
R1(dhcp-config)#option 150 ip 192.168.88.1
- Configure Telphony Service on R1:
R1(dhcp-config)#telephony-service
R1(config-telephony)#ip source-address 192.168.88.1 port 2000
R1(config-telephony)#max-dn 3
R1(config-telephony)#max-ephone 3
R1(config-telephony)#auto assign 1 to 3
R1(config-telephony)#ephone-dn 1
R1(config-ephone-dn)#number 1001
R1(config-ephone-dn)#ephone-dn 2
R1(config-ephone-dn)#number 1002
R1(config-ephone-dn)#ephone-dn 3
R1(config-ephone-dn)#number 1003
- Configure SW1
SW1>enable
SW1#conf t
SW1(config)#vlan 10
SW1(config-vlan)#int fa 0/1
SW1(config-if)#switchport mode trunk
SW1(config-if)#int range fa 0/2-4
Sw1(config-if)#switchport voice vlan 10
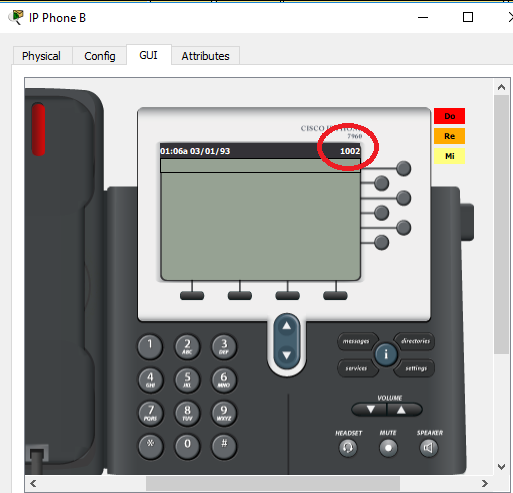
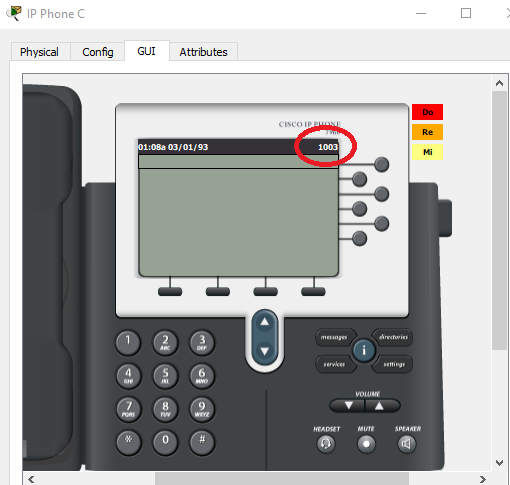
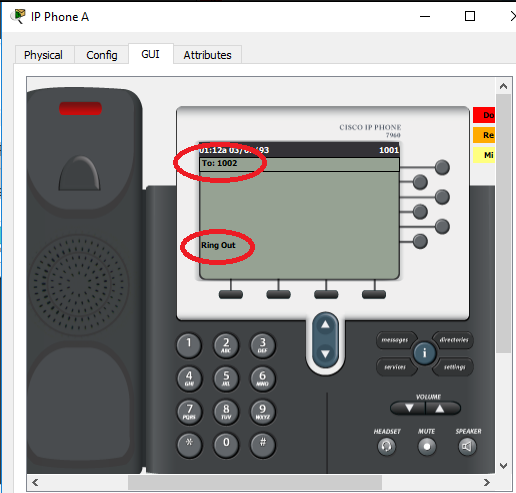
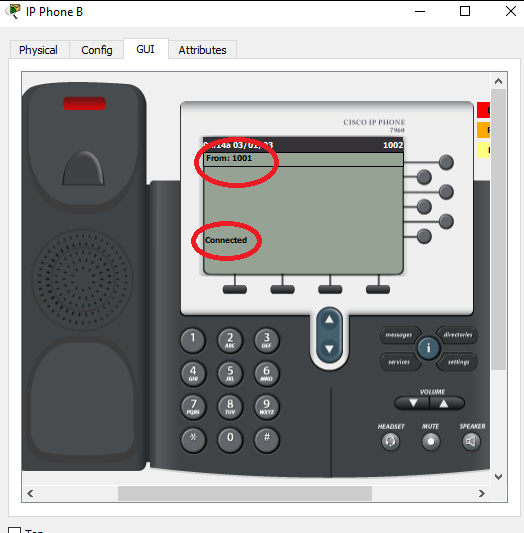
- Make sure all IP_PHONE has got their respective phone numbers 2, if not try to double check the configuration above


- Open GUI mode and enter the designated telephone number and press enter or click on the telephone receiver and the telephone with the destination number will be lit and ringing.


- If it says Connected, it means that it has been successfully connected and the configuration is complete

VOIP settings in Mikrotik
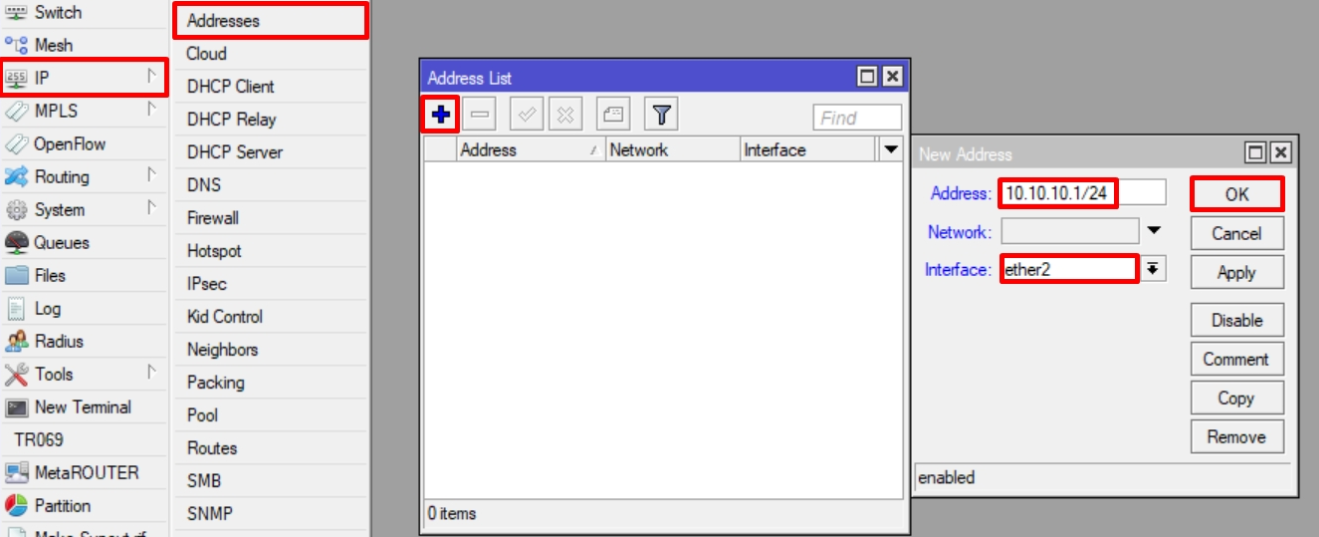
- Open the proxy, go to the ip tab> adresses> add (+) add ip for example 10.10.10.1/24 which can later lead to the laptop and trixbox server in virtual box.

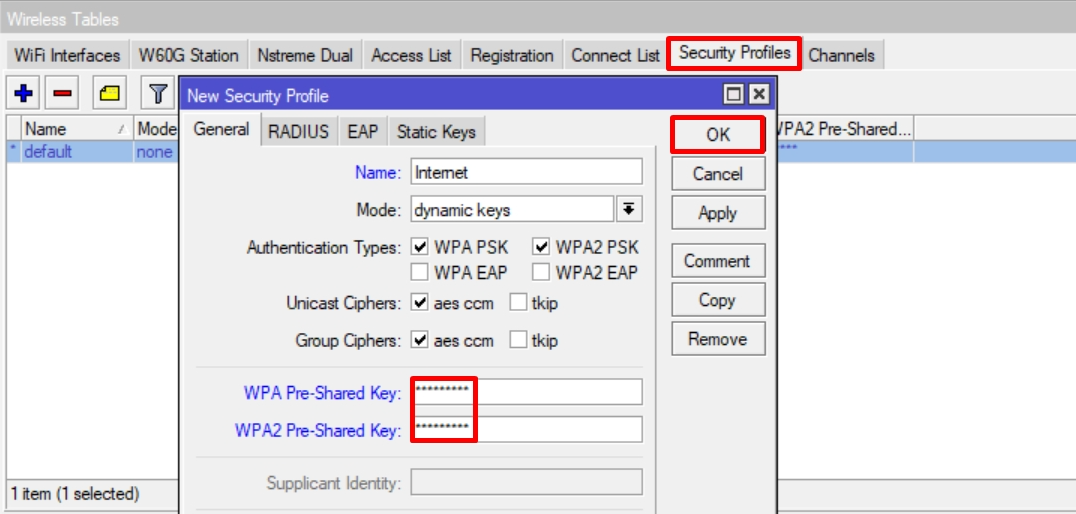
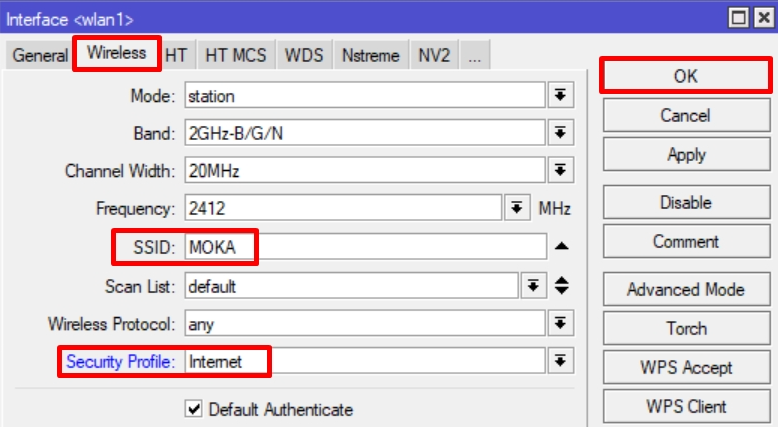
- Go to the wireless tab, if the access point (wifi) uses a password, go to the security profile, add the next access point password, then click OK.

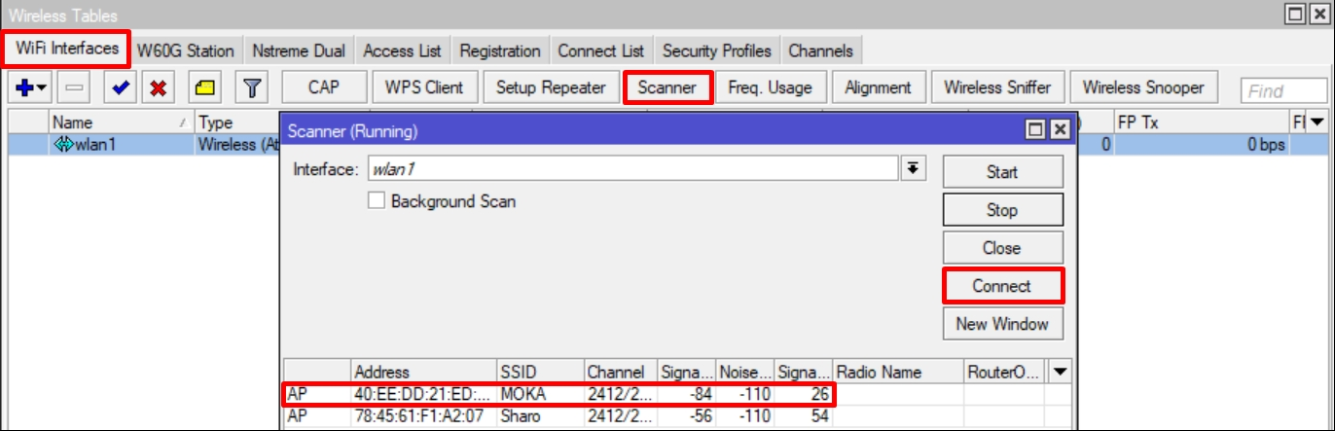
- So here you can scan the existing access point, here you can connect the next access point with the security profile createdearlier

- Clickwlan1> wireless security input profile created earlier

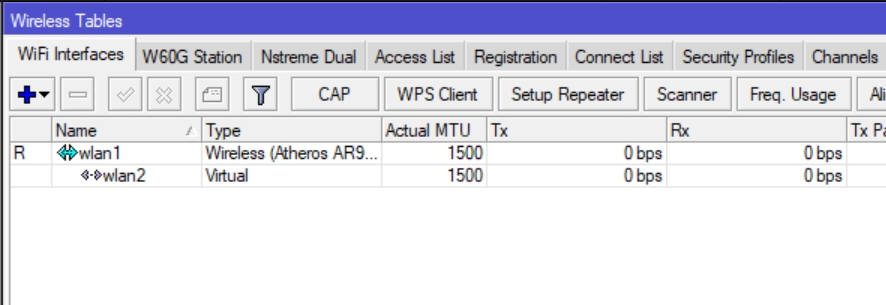
- If the router device has been connected to the access point after that, there will be a notification R, which means running.

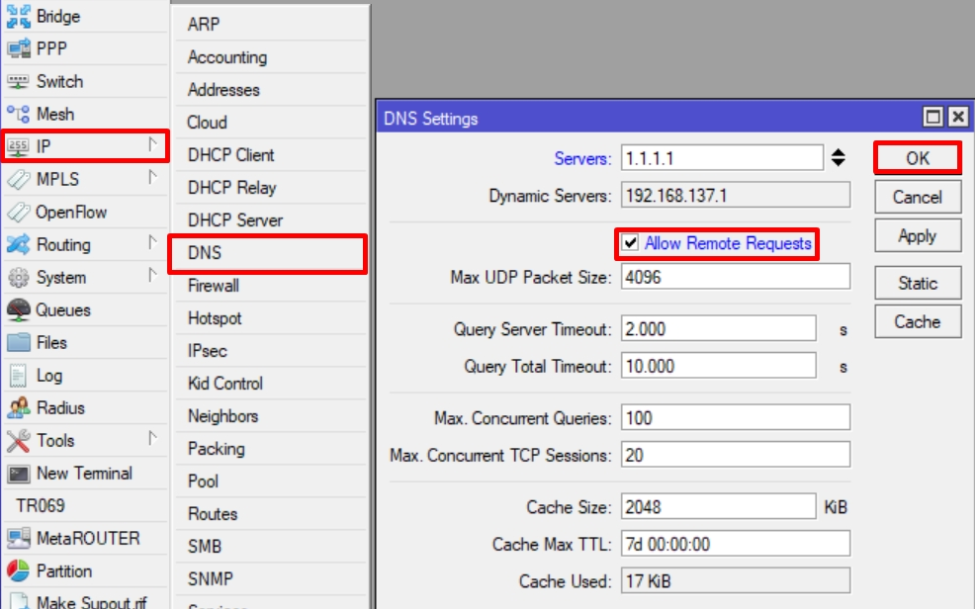
- Next go to IP> DNS Enable Allow remote requests then OK

- Then go to IP> Firewall> NAT switch the chain to srcnat and out int to wlan1, that is, the access point is
- in action, switch to masquerade so that the client’s local ip can be disguised to ip public
- Go to the wireless tab> add (+)> virtual we create virtual access points which can later be distributed to the client, namely the smartphone.
- Here the virtual access point has been made

- Add an ip address that leads to wlan2 so that the client gets an ip
- Create a DHCP Server so that the client gets an ip address.
- Here the DHCP Server has been made for wlan2.
- Back to the laptop, which can unite the router and the trixbox server in a similar network because I use a virtual box trixbox, whose interface will be changed to a bridge adapter and focus on ethernet those who have 1 network with
- proxy Go to trixbox enter the command system-config-network then select e dit devices to set the ip address
- Select eth0 to set the ip address
- Set the default gateway ip input to match the ip router then OK
- Next restart the network so that the ip setting was applied
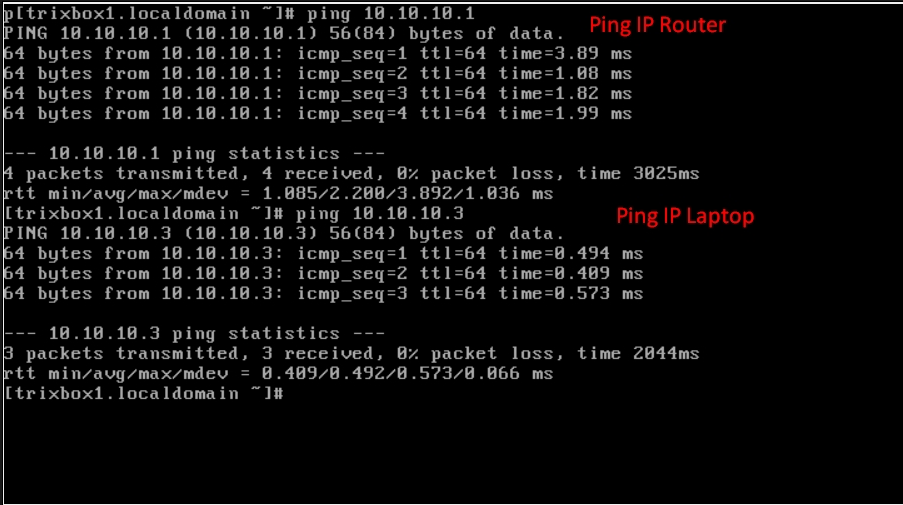
- To test ping the IP Router and IP Laptop the results were successful as shown below

- Through appearance UI with Trixbox default User and default password, namely user maint and password to make changes to admin rights, click the switch in the upper right corner, then enter the user and password.Next
- , add the VoIP user extension, go to PBX> PBX Settings> Extensions.
- Add a suitable user extension that you want and don’t forget to fill in the secret for the password when logging in to Zoiper
- Then submit, after submitting, apply the configuration Changes then just select Continue with reload
- For VoIP Client, similar to before I used Zoiper if those who haven’t downloaded can download it on the Play store , make sure there is also a MikroTik AP Network that was created earlier.
- Create an account. Next to the Hostname or Provider is the IP Address or Local Domain The trixbox server itself
- In the Authentication and Outbound Proxy section enter the first user extensions that have been created on the trixbox server and for the outbound proxy enter the IP Trixbox Server Address
- Then you can automatically get UDP SIP, then we are next, just go
- to the 2nd smartphone, make sure that you have one network with the AP that you created earlier. Create an Account, the next for Hostname or Provider is the IP Address or Local Domain Server, Trixbox is cent Self in the
- Authentication and Outbound Proxy sections similar to the previous one, enter the second user extensions that have been created on the trixbox server and for outbound proxies enter the Trixbox Server IP Address,
- then we can automatically get UDP SIP, then we are next.
- For testing, try the second target number 111 via the first smartphone Go to
- If the call has been received, the setting was successful!

![]()
