

Have you ever used the internet by connecting to public wifi? If so, the device you use to connect to the wifi will get a local IP that is given by the wifi router and it is called the DHCP server configuration.
Now this local IP is the result of the DHCP server setting protocol which automatically creates an IP for each device connected to the router.
What is DHCP? DHCP stands for Dynamic Host Configuration Protocol which functions so that devices can easily distribute IP addresses to a network evenly without having to manually set IPs to each connected device.
Imagine if there is no DHCP protocol then every technician has to set IP for every device that can connect to the network which will take a lot of time. Want to know more details about Server Rentals on NetData? you can visit here.
Table of Contents
DHCP Server Configuration
There are two procedures for setting up a DHCP server, namely the automatic way or the manual method.
As for how to activate the DHCP server, this is not too difficult, which you can do in stages.
In general, the settings are first DHCP IP Address Network, install DHCP Server, Configure DHCP, and restart the network completely.
If it has been made, the next step is to verify the IP address that has been made, by checking whether the IP address has arrived or not for all computers in the network.
To fix this, you can use the command prompt facility by writing the command “IPConfig”.
If it has been checked from the DHCP client side, the next step to setting the DHCP server is to verify the IP address with a connection test.
How to configure the DHCP server is also the same as using CMD and writing the command “ping” to call the server, if successful it will reply by displaying the same IP address.
DHCP Server Working Principles
Talking about the DHCP server configuration is to automatically create IP addresses for devices connected to the network.
So the DHCP server is a set of addresses that are allowed to be used by each client, which is also called the DHCP pool.
Then each client or device connected to the network will lease an IP address from the DHCP pool that has been determined by DHCP itself, generally it can be used for several days.
If the time has reached the deadline, the client will ask for an IP address to the server in accordance with the IP address that the DHCP server has configured before. The requested IP address can be new or can also be extended.
DHCP Server Classification
The workings of the finished DHCP server configuration are when the user turns on a device, be it a computer or laptop, it will be connected directly to the DHCP server.
Then this computer will automatically ask for the DHCP IP address from the IP server. Then the server will immediately answer this client’s call and provide an IP address that has been previously configured by the DHCP server.
The various classifications of how the DHCP server configuration works are as follows:
DHCP Scope
DHCP Scope is a collection of IP addresses that are leased to DHCP clients. This DHCP scope is configured by the administrator using a DHCP server configuration.
This type of DHCP is the most common type where it provides an IP address that can be leased for a certain time, namely the DHCP lease which has an active period of up to 3 days.
Information about the DHCP Scope will be stored in a database on the DHCP server.
The value of this leased IP address can be retrieved from the DHCP pool to allocate IP addresses on the network.
If there is an error in the DHCP server configuration, it is an error in the DHCP Scope configuration.
DHCP Lease (Reservation)
DHCP lease is the time limit for leasing an ip address assigned to a DHCP client from a DHCP server.
Usually, the DHCP server lease configuration is carried out by an administrator using a configuration from within a special operating system for servers such as Windows NT Server which has a DHCP manager feature.
Apart from Windows NT Server, you can also use Windows 2000 and above which features the Microsoft Management Console [MMC]). DHCP server settings DHCP Lease is also often referred to as a reservation.
DHCP Options
DHCP Options are options or additional IP address settings by the DHCP server to clients.
Usually this DHCP option is given when a client requests an IP address from the server, the server will provide at least an IP address and a network subnet.
DHCP server can also be applied by all specific DHCP Scope servers and clients, or to a specific host in the network.
In the Windows NT operating system, there are frequently used DHCP options which can be arranged in the following table:

Configuring and Installing DHCP Server
Install dhcp3-server
To configure the DHCP server and the first installation is to prepare the dhcp3-server software. The commands for the installation of the dhcp3 server are as follows:
root @ server: # apt-get install dhcp3-server
Important notes that you should pay attention to:
- Files from the main configuration are stored in the file /etc/dhcp3/dhcpd.conf
- Specify the interface you want setting to serve IP address requests from clients (eth0 or eth1).
Configuring dhcp3-server
To configure dhcp3-server you can retrieve the file that is located in the file /etc/dhcp3/dhcpd.conf.
To edit the DHCP server configuration file you can use the nano editor.
Before configuring a DHCP server, there are a number of things that you need to pay attention to, such as:
- Giving IP addresses to clients must be in one Network with the server IP address.
- First determine the range of IP addresses that are allowed or assigned to clients.
- In addition to the client IP address, it must also be equipped with a subnet, netmask, dns server, gateway, broadcast.
Edit the dhcpd.conf file with the command:
root @ server: # nano /etc/dhcp3/dhcpd.conf The
following is an example of a configuration file that will be provided on a DHCP server :
#…
# Simple configuration for local Network
subnet 10.252.10.0 netmask 255.255.255.0 {
range 10.252.10.10 10.252.10.20;
option domain-name “Your_domain.com”;
option domain-name-servers 10.252.10.1;
option routers 10.252.10.1;
option broadcast-address 10.252.10.255;
default-lease-time 600;
max-lease-time 7200;
}
# …
Please restart the service every time you make changes to the configuration file with the following command:
root @ server: # /etc/init.d/dhcp3-server restart
Configuring the DHCP server on Debian GNU / Linux
Configuring the DHCP server can also be done on Debian GNU / Linux you can install isc-dhcp-server with the command apt-get install isc-dhcp-server.

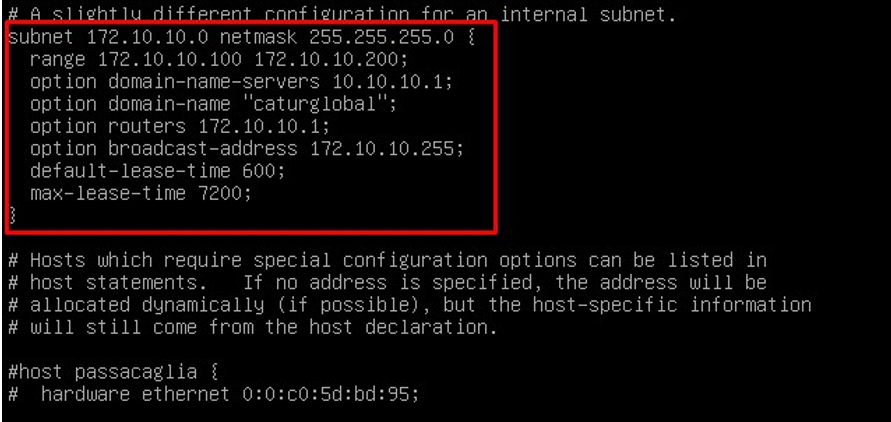
Then edit the DHCP server Configuration file in /etc/dhcp/dhcpd.conf. Usually in the middle of the file there is a line A Slightly different etc. which you can remove the hash mark from the subnet to the} sign to activate it.
Here we need to determine the value of Broadcast, network, Domain Name server, netmask, range, Domain Name, Option Router (Gateway), for an active lease period of 600 seconds and a maximum active lease of 7200 seconds.
Subnet is the Network that we use, which is 172.10.10.0 and then with a netmask / 24 which is 255.255.255.0.
Then determine the range of IP addresses that can be used for clients, for example, we make the range 100 to 200, so the range 172.10.10.100 to 172.10.10.200 for Domain-name-servers is important to use the DNS server configuration so that our DNS is read or indexed on the client later.
Then enter the DNS IP address into the server, for example, for example 10.10.10.1 = example website.com.
Then the routers option is the Gateway IP address used on the DHCP server, which later on our IP server will point to the client, namely 172.10.10.1 for broadcast, of course 172.10.10.255
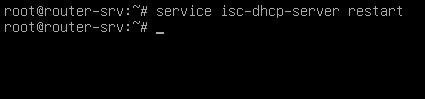
As usual, if it’s been edited, we restart the service with thecommand serviceisc-dhcp- server restart
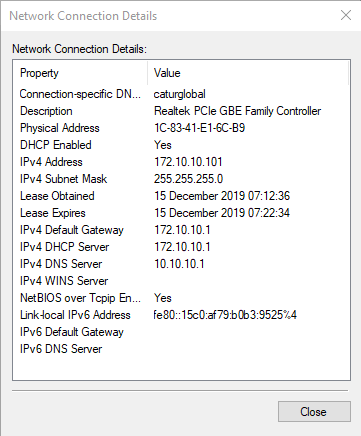
On the client side we can see that the DHCP IP has been automatically obtained.
Configuring a MikroTik DHCP Server
Besides using a Windows server, we can also configure a DHCP server that can be done on a Mikrotik routerboard device.
The trick is you can open the Winbox application then click IP> DHCP Server> Click DHCP Setup.
If the DHCP setup menu opens, then you can click next until it’s finished.
First we select the interface that we want to activate the DHCP server, for example ether1.
Then the ether 1 server IP address will come out as well as the IP gateway for example 192.168.88.1.
Then fill in the DHCP address to Give Out the IP address range that you will want to provide to the client. For example 192.168.86.2-192.168.86.254.
For this IP address range, you can adjust it to the number of existing devices, the smaller the network speed will be the more optimal.

DNS will be given to all devices that request DHCP.
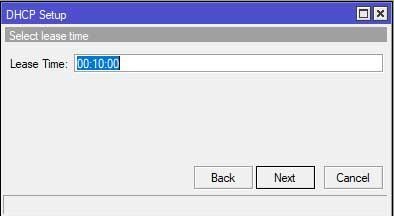
Lease Time is the length of time the IP address will be lent to the client. So that the IP address doesn’t run out quickly then you set it for at least 1 hour, then click Next, done.
You can fix this by connecting to the server and then changing the PC IP settings to the position “obtain an IP address automatically”.
Sometimes there is a DHCP server that is not running or an error, this can be resolved by:
- Restarting the Mikrotik
- Ether which is activated by the DHCP server to become a slave or bridge by another ether so that it experiences an error.
- The IP address is full, so you can delete unused IP leases or add new IP address ranges in the pool.
That’s a review of the DHCP server configuration which might be used as a reference for those of you who are still beginners, hopefully this is useful. Interested in DHCP Server service from NetData? You can contact us here.
![]()
