On this occasion, we will discuss the Mikrotik IP pool configuration. However, what is an IP Pool?
IP Pool is one of the features of Mikrotik to determine the IP range that can limit clients that connect wirelessly and are used for DHCP Server and Point to Point. The IP Pool function on Mikrotik is to limit the IP range that will be distributed automatically by the DHCP system.
Table of Contents
Configuring IP Pool on MikroTik
Before entering the Mikrotik IP Pool configuration, there are various questions that many people may still be confused about IP Pool, more specifically, the various problems that are often experienced and how to overcome them.
- What is defined by the IP NAT Pool command when configuring dynamic NAT?
- Dynamic NAT?
- global
- address pool internal IP address range translated
- available NAT server pool
- range of external IP addresses allowed to be accessed by internal hosts
- Failed to give out ip address pool is empty proxy
Maybe this problem is often very annoying, running out of IP is very unpleasant. Maybe to fix it, there are things that might be done.
The trick is to change the subnet. For example from / 24 to / 21.
- Setup failed to add ip pool pool with such name exists.
In this case, for example, the DNS entered is the one that does “ipconfig / all” on the computer connected to the wlan.
Hotspot address set to 10.5.50.1/24
In Route List has the following:
- 0.0.0 / 0 194.68.219.145 reachable 530
- 5.50.0 / 24 bridgeclient reachable
- 168.88.0 / 24 ether1 unreachable
- 168.254.0 / 24 bridgeclient reachable
- 69.219.144 / 28 530 reachable
- Cannot assign ip address – no more free addresses from pool
On this one problem is actually quite simple, is to get a HWMP plus mesh network.
Check the Router Products from NetData here:
[ux_products]
OK, now enter the Mikrotik IP Pool configuration:
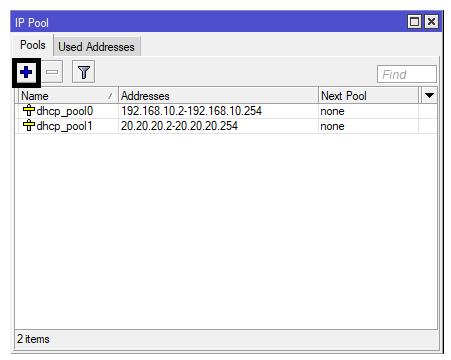
- Enter Winbox> Select Ip> Click Ip Pool> Click Add (+)
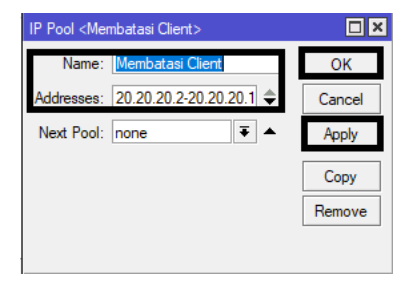
- Type Name = Limiting the Client> Type Address = 20.20.20.2-20.20.20.10> Click Apply then OK
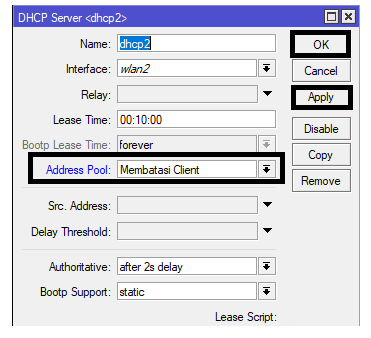
- Select Address Pool = Limiting Clients> click Apply, then click OK
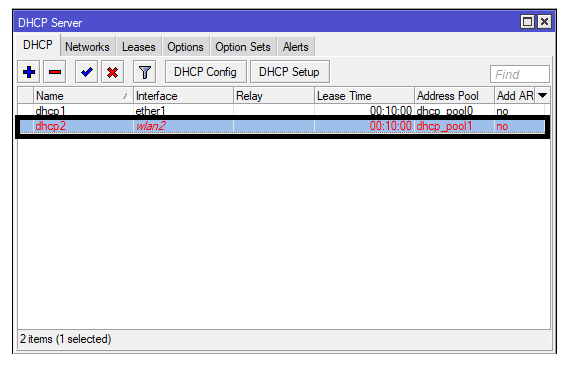
- Select Address Pool = Limiting Clients> click Apply, then click OK.
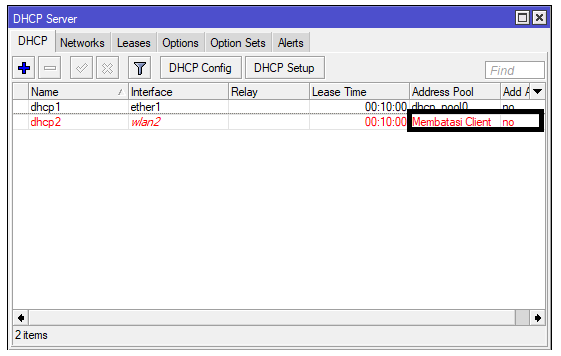
- Then go to Dhcp -Server> Make sure in Dhcp2 the Address Pool will change to limit the client
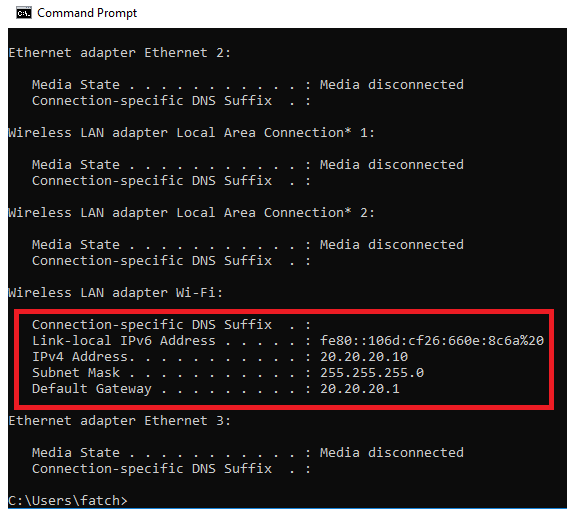
- the next step is to go to Cmd then check the IP you get> Type ipconfig> then look at the IPv4 Address section you will get an Ip 20.20.20.10
IP Hotspot Solutions Are Full 254 IP Addresses
IP Pool hotspot from 10.5.50.10 – 10.5.50.254
For example, it is full, the IP address used is 10.5.50.1/24
- The solution is to change it to 10.5.50.1/23
- Then the pool widen, if / 23 it will be 10.5.50.10 – 10.5.51.254
- This way we get 510 IP address or 10.5.50.1/22> You can get 1022 hotspot IP address
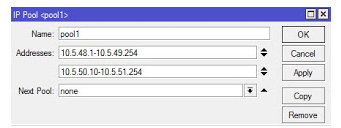
The following is an example of the IP Pool
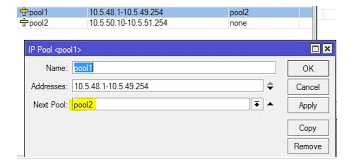
[Script] How to Save IP Pool on the Mikrotik Hotspot Network
To save IP Pool, the logic is to clean the DHCP lease so that the IP Pool becomes more efficient. Here’s how:
Create a scheduler (System → Scheduler) with the desired interval (for example, this script is executed every 6 hours), then copy & paste the script below to the source member.
# Make Static Lease for Active Hotspot
: log warning message = (“[START] * CLEAN UP DYNAMIC DHCP LEASE *”);
: foreach z in = [/ ip hotspot active find] do = {
: local u ([/ ip hotspot active get $ z user]);
: local m ([/ ip hotspot active get $ z mac-address]);
: local a ([/ ip hotspot active get $ z address]);
/ ip dhcp-server lease make-static [/ ip dhcp-server lease find mac-address = $ m];
/ ip dhcp-server lease comment [find mac-address = $ m] $ u;
};
# Clean Dynamic Lease and Waiting Status
/ ip dhcp-server lease remove [find dynamic]
/ ip dhcp lease remove [find where status = waiting]
: log warning message = (“[END] * CLEAN UP DYNAMIC DHCP LEASE *”);
After pasting, click Apply then click OK. Thus this script can perform periodic cleaning according to predetermined intervals.
![]()


