

If a company is already large, of course, it doesn’t only have 1 office, but there are other offices in different regions that need a Mikrotik eoip tunnel. Usually, companies want the central and branch companies to be able to interconnect with each other for file sharing, VOIP, and other company needs.
The problem faced is that when the branch company is located in a different city from the central company, it will make it more difficult to connect with each other. However, if you use Mikrotik, there is a very effective event. Is to use the Tunnel.
Check out NetData Router and Access Point Products here:

Networks
Inspur

Networks

Access Point

Access Point
To build a tunnel, both branches and head offices must be connected to the internet and have a public static IP. Tunneling is a way to build a path between proxy routers on a TCP / IP connection. Tunneling can be described like this:

Later, with Tunneling the head office and branch offices can communicate with each other for company needs, one of which is sending files.
Mikrotik has a technology in the form of EOIP which is used for the Mikrotik eoip tunnel. However, what is meant by EOIP?
EOIP (Ethernet over IP) is a protocol on Mikrotik RouterOS that is useful for building a Network Tunnel between Mikrotik routers on a TCP / IP connection. EOIP is a Mikrotik proprietary protocol (it supports Linux but must be compiled manually). So to take advantage of this feature, routers in the Head Office and routers in Branch Office are required to use a Mikrotik router.
EOIP Tunneling Configuration on MikroTik
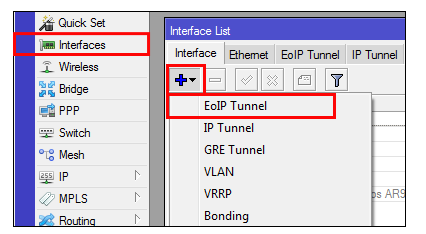
- First, add the EoIP interface in the “Interfaces” menu. Click the + (add) button, after that specify EoIP. This step is carried out on both routers, both routers in the Head Office and routers in the Branch Office

- A new interface properties will appear that we need to set, the most important is the parameters “Remote Address” and “Tunnel ID”. When setting the MikroTik router on the side of the Head Office, fill in the Remote Address parameter with the Public IP owned by the router available at the Branch Office.
Do the same thing when setting the router on the side of the Branch Office, analogous to exchanging information on Public IP. Then for the Tunnel ID parameter, make sure it has a similar value on the Tunnel ID of the Head Office router with the Branch Office router.

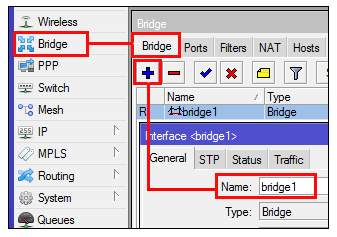
- If EoIP is running and the “R” flag appears, after that we create a bridge that can bridge the transmission of knowledge originating from the LAN network that can go through EoIP. Enter the Bridge menu, then click the + (add) button. Fill in the bridge name as desired.

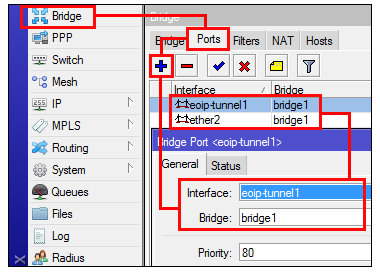
- Next, add the EoIP interface and ethernet interface that is connected to the local LAN network into the Bridge Port. So there are two interfaces that become bridge ports.

- When finished, try pinging the host from the local network under the router, for example from the local host in the Head Office pinging the host in the Branch Office.
Interested in IT services from Netdata? You can contact us here.
![]()
