

How to Set Cisco DHCP Router – The need for a computer network in a company cannot be eliminated, especially now that the era of business digitization is in place, where companies must adapt to create a digital business.
In creating a corporate network of course requires a variety of network devices such as routers, especially Cisco routers.
In this article, we will discuss network questions that are often asked by people, namely how to set Cisco DHCP router.
Table of Contents
About Cisco Routers
Talking about Cisco routers, network devices that are most often relied on to build wide area networks (WANs).
In using a Cisco router will be able to channel information to the addresses that exist in a computer network.
In sending data packets from one local network to another, Cisco routers use routing tables and rules that play a role in managing data traffic. Regarding the Cisco router DHCP settings.
Cisco routers are tasked with identifying and forwarding to the destination address. So that data packets can be received quickly to their destination, the router also needs to send data to the right place.
Cisco Development History
Cisco’s development began in 1980, when a husband and wife pair Len and Sandy Bosack worked in the computer department at Stanford University.
In overcoming the problem of making computers, they made a gateway server that is able to communicate between computers with the help of the IP protocol.
In 1984, Cisco systems were first founded by having a small commercial gateway server which was a revolution in the field of networking.
For several years, 1992, to be exact, the Mid-Range Gateway Server (MGS), Compact Gateway Server (cgs), Integrated Gateway Server (IGS) and AGS+ were created.
Cisco develops various types of routers such as the Cisco 4000, 7000, 2000, and 3000 series which are still being used and developed for the better..
Cisco Router Type
Before discussing how to set Cisco DHCP router, we need to know several types of Cisco routers which are classified by several series and models as follows:
- Cisco Router Type Fixed Access Level
- Cisco router 700 series
- Cisco router 801-804
- Cisco router 805
- Cisco router 811 dan 813
- Cisco router 827
- Cisco router 1000 series
- Cisco router 2000 series
- Cisco router 2500 series
- Cisco router 3000 series
- Cisco Router Access Level Modular Type
- Cisco router 1600 series
- Cisco router 1720 dan 1750
- Cisco router 2500 series
- Cisco router 2600 series
- Cisco router 3600 series
- Cisco router 4000 series
- Cisco Router Core Level Modular Type
- Cisco router 7000 series, untuk enterprise
- Cisco router 10000 dan 12000 series, untuk enterprise
Cisco Router Features
Cisco routers are different from other brand routers, one of which is that the Cisco router features are quite complete.
Cisco routing offers the best features to enhance system routing capabilities, security, stability, and best data delivery performance.
Cisco’s advanced router technology allows you to build a large network with a complex network structure, both intranet and internet.
How to Setup Cisco Router DHCP
In knowing how to set Cisco DHCP router, the goal is for client computers on the local network to get an address in the form of an IP address automatically without the need to set it manually.
Therefore we need a server that is able to provide an IP address to the client computer.
This server computer is a DHCP (Dynamic Host Configuration Protocol) Server. This DHCP server has the ability to automatically assign an IP address to every computer connected to the server.
There are two ways to set Cisco router DHCP, among others:
The First Way Set Cisco Router DHCP
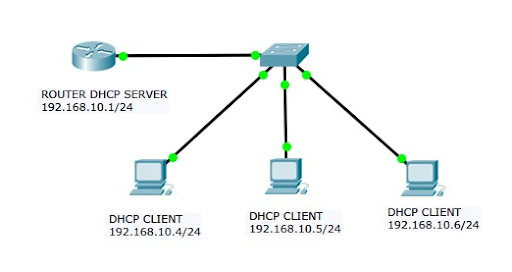
The following is how to set the DHCP router for the first Cisco as an example, you can see the network topology below:
Settings on the Router
For the first thing, the Cisco router DHCP setting is setting the router so that the DHCP service can be enabled and creating an IP address range for the connected computer.
| Router(config)# service dhcp |
| Router(config)# ip dhcp pool NET-POOL |
| Router(dhcp-config)# network 192.168.10.0 255.255.255.0 |
| Router(dhcp-config)# default-router 192.168.10.1 |
| Router(dhcp-config)# dns-server 8.8.8.8 |
| Router(dhcp-config)# exit |
| Router(config)# ip dhcp excluded-address 192.168.10.1 192.168.10.3 |
Information :
Line 1: DHCP service is enabled
Line 2: name the DHCP pool with the name NET-POOL
Line 3: IP Network and Subnet used
Line 4: IP Gateway
Line 5: DNS server IP
Line 7: setting the IP range so that if the client computer is connected to the network it can start with the IP address 192.168.0.4
Verification on PC

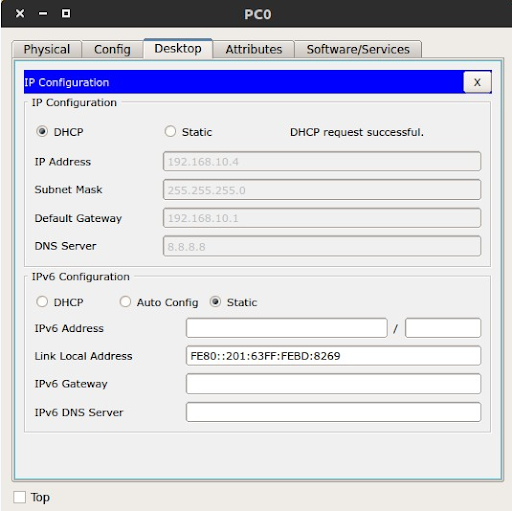
If the router has been set up then we need to verify whether the client computer really has the first IP address which is 192.168.10.4 as shown below :
Verification in Router
Also verify on the router which you can see by typing the command IP DHCP POOL
| Router# sh ip dhcp pool |
| Pool NET-POOL : |
| Utilization mark (high/low) : 100 / 0 |
| Subnet size (first/next) : 0 / 0 |
| Total addresses : 254 |
| Leased addresses : 1 |
| Excluded addresses : 1 |
| Pending event : none |
| 1 subnet is currently in the pool |
| Current index IP address range Leased/Excluded/Total |
| 192.168.10.1 192.168.10.1 – 192.168.10.254 1 / 1 / 254 |
Router#sh ip dhcp binding
| IP address Client-ID/ Lease expiration Type |
| Hardware address |
| 192.168.10.4 0001.63BD.8269 — Automatic |
| 192.168.10.5 00D0.BAAC.A45C — Automatic |
| 192.168.10.6 000C.CF4E.1593 — Automatic |
Second Way Set DHCP Router Cisco
For the second Cisco router DHCP setting, using the Cisco Packet Tracer application:
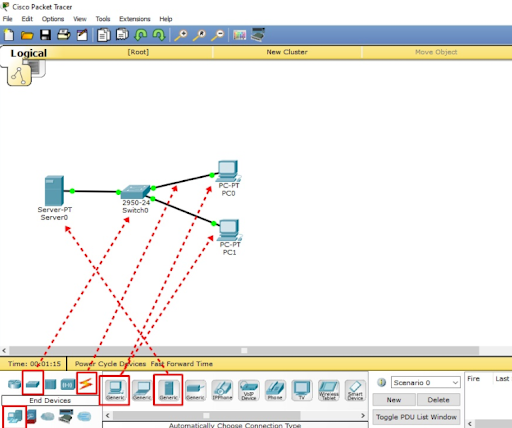
Create Topology
In the Cisco Packet Tracer application we can create network simulations using Cisco routers as well as how to set Cisco DHCP router.
First we can describe a network with a server computer or router, a switch and a client computer using a straight cable.
Server C
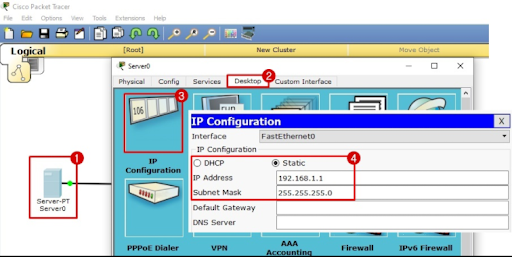
- Service > On
- Default Gateway > Fill in Server IP 192.168.1.1
- Start IP Address > fill in the IP Address range starting from eg 192.168.1.2
- click Add.

Until now we have finished how to set Cisco router DHCP on the server or router side.
Client Configuration
In addition to the server side, the client side must also be set to use the DHCP protocol by clicking on the client computer > Desktop > IP Configuration > DHCP.
After waiting for a while, the client will receive a new IP address from the server automatically as shown below:
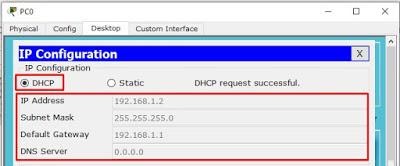
Perform this step to all other client computers.
Complete explanation of how to set Cisco DHCP Router on NDS
Those are some explanations on how to set up Cisco dhcp routers that might help you in setting up the router more easily.
Routers are very important in building a network in a company, especially with a wider and more complex network, of course it will require people who are experts in setting up and compiling the network.
Therefore, NetData offers a variety of network managed services that can help your business grow.
NetData is full of professional staff who are ready to help you build a small to large scale network so that you can focus more on growing your business.
![]()
