

Mikrotik is a brand that is well-known for its various hardware and software that are involved in the internet network world and Mikrotik itself has a tool called the Mikrotik User Manager which is useful for managing various hardware and software from Mikrotik.
User manage (UM) is a management system that can be used in a variety of settings. UM can be used for HotSpot, PPP, DHCP, Wireless and RouterOS users. User Manager is a RADIUS server application. UM testing packages were first introduced in RouterOS version 4. User manager packages are supported on all RouterOS architectures including x86 and Cloud Host Router.
Table of Contents
Download Mikrotik User Manager
Before going deeper into the discussion and how to use Mikrotik user manage, the first thing to do is download Mikrotik user manage. Here you can choose which series you need.
User Manager Mikrotik is downloaded from the downloads section of the MikroTik website. There find the system and software version you need for this package and download the additional package archive for it, you can download user manage download user manager mikrotik rb941, download user manager mikrotik rb750 or download user manager mikrotik rb750gr3.
To install the package, simply upload it to the device and reboot the unit when it’s finished downloading user manage Mikrotik.
A default customer with a blank admin login and password is created when the user manage package is installed for the first time.
Check Router Products from NetData here:
Networks
Inspur
Networks
Access Point
Access Point 

Download User Manager Mikrotik rb750gr3
In this example, we will use user-managed Mikrotik rb750gr3, this one package is indeed easy to use and with a more comfortable interface using the GUI. So, there is no need to be complicated like using the CLI.
The following is how the configuration of user manage Mikrotik rb750gr3:
Before entering into configuration, know how to log in from user management from Mikrotik.
[admin @ MikroTik] / tool user-manager customer set admin password = admin password
After that, you can use the print command to see what you have added.
[admin @ MikroTik] / tool user-manager customer> print
Flags: X – disabled
0 login = “admin” password = “admin password” backup-allowed = yes currency = “USD”
time-zone = -00: 00 permissions = owner signup-allowed = no paypal-allowed = no
paypal-secure-response = no paypal-accept-pending = no
Connecting with Mikrotik
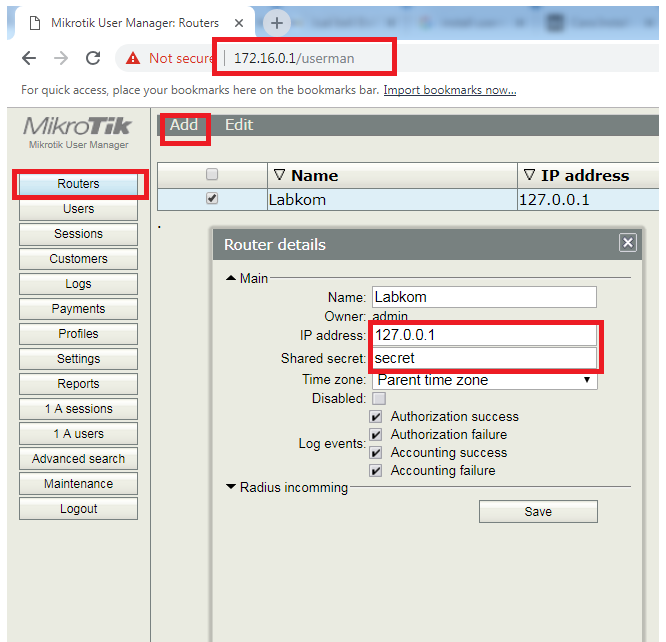
In order for users to connect with Mikrotik, all you need to do is activate the radius from the server. This tutorial will exemplify the user as a hotspot user. Follow the steps in the image below:
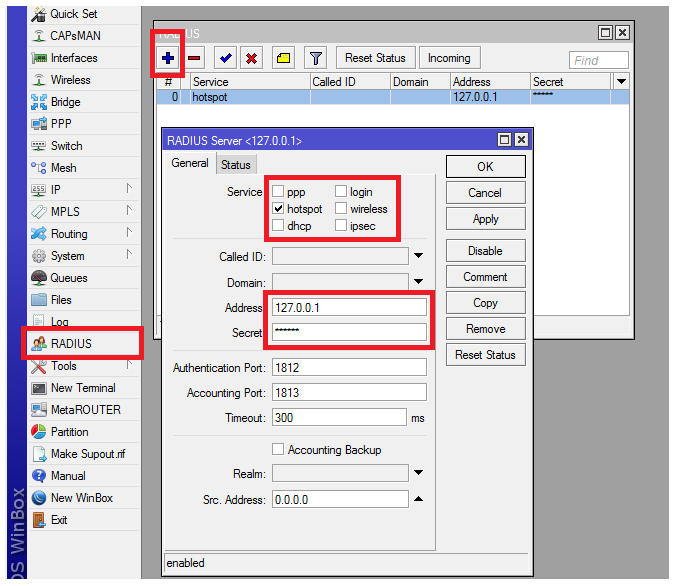
Enter Userman by entering the admin username along with the blank password. Then go to the Routers menu and add a new router with the IP Address and Secret according to the Radius Server in Mikrotik.
Change Access Rights to Userman
You must also change the default Userman access rights settings by changing or providing a Userman username / user by entering the Customers menu and clicking the Add button to grant users or change admin access rights. The following is an example of the picture:

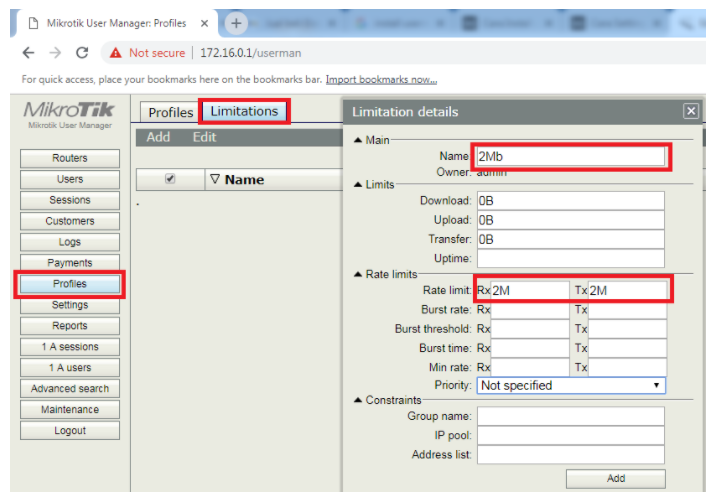
Creating a Profile and Limitation
Add a Limitation if your hotspot user connection will be limited / limited with steps to enter the Profiles menu then Limitations, for example you will limit hotspot users with Upload and Download by 2 Mb. Look at the following picture:
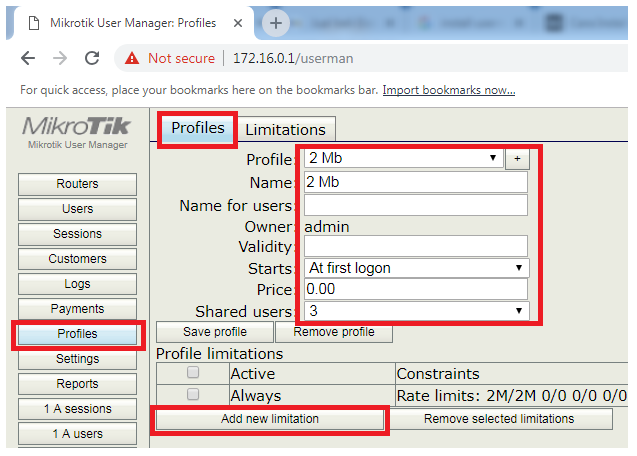
After that, make a new Profiles, then add a profile limitations and choose the limitations that have just been made. When finished, click Save Profile to save the configuration.
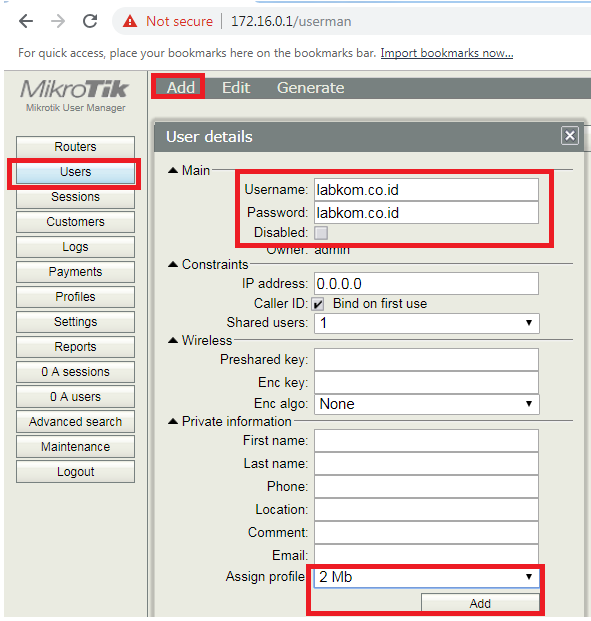
Adding User Manage Mikrotik
Adding users can be done after the limitations and profiles are created. You can create a user by going to the Users menu and selecting Add and selecting a profile in the assign profile section.
Integration of Radius Server with Hotspot Server
So that users can be integrated with each other with your hotspot server, you must activate Radius in the Server Profile along with steps to enter the IP menu -> Hotspot -> Server Profiles, then choose the name of the server profile that radius server will activate. Look at the following picture:

![]()
