File sharing is an activity in which internet users can share folders and files together with other internet users by means of the file provider first uploading files to the server computer and then other internet users can download the next file from the server computer. Usually in companies there are problems that occur in the network. If you want to know how to solve network problems within the company, you can read in more detail here yes.
There are many more sharing functions, such as:
- Sharing resources, for example sharing a printer, CPU, memory or hard drive pins
- As communication services, for example email, instant messaging, chatting
- As access to information, for example web browsing
- Save money, for example: printers, share folders No network pc one printer can be used by more comes from one computer
- high reliability, for example, one pc is damaged then the data in it is lost, the data can still be reused on another computer that stores such data
Table of Contents
How Sharing Files / Folders in Windows
Okay, Now go to how to share folders in Windows. Before you start the File Sharing process or share files between computers, you must first adjust the Network Sharing settings for your laptop. The trick is as follows:
- Open the Control Panel on your Windows computer
- Select Network plus Sharing Center
- Click the post “Change advanced share settings” on the left side of the screen.
- In the “Advanced share settings” window, find the profile you are currently using. There are 2 profiles available, namely “Home or Work” and “Public”. How do I find out? You just need to see the profile that contains the sentence Current Profile.
How to Share Drive or Local Disk in Windows
Now go to how to share data using a local disk.
- First, determine which drive you want to share folders. After that right click on the drive to be shared, then select share with> advanced sharing.
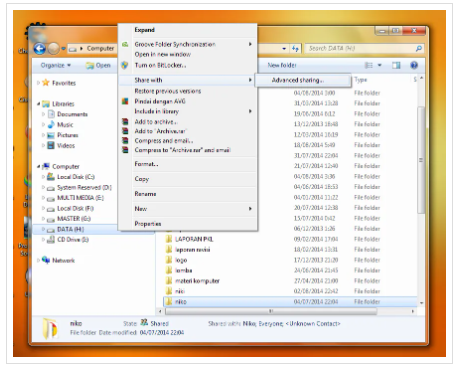
- Automatically will open the properties window and be on the sharing tab. Then click Advanced sharing.
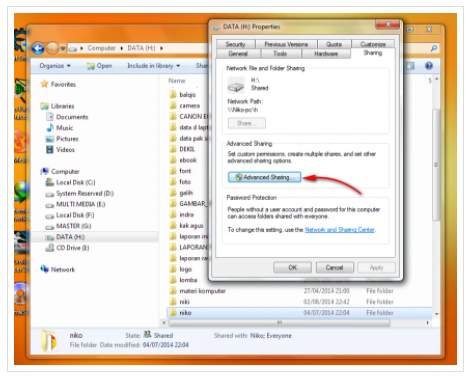
- The Advanced sharing window will open, then put a check-box on Share this folder. Then click the permissions button to add users and set permissions.
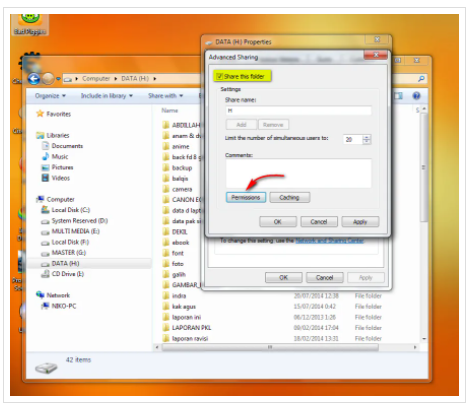
- Click the add button if you want to add a user or group, if I’m just Everyone because it includes everything. Then set the permissions. After that click ok.
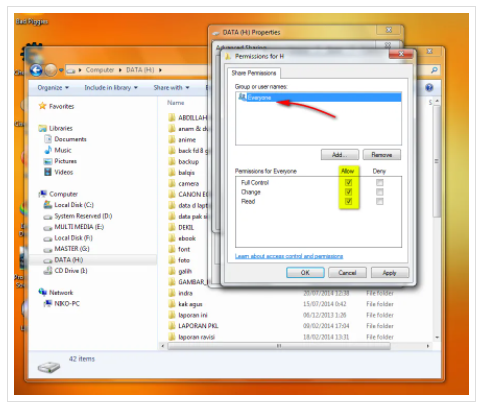
- Then back again to the properties window, switch to the security tab. Then click the Edit button to add a user and set permissions.
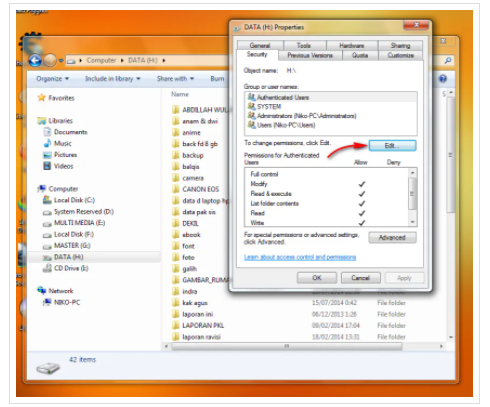
- The Permissions window will appear. To add a user click the add button.

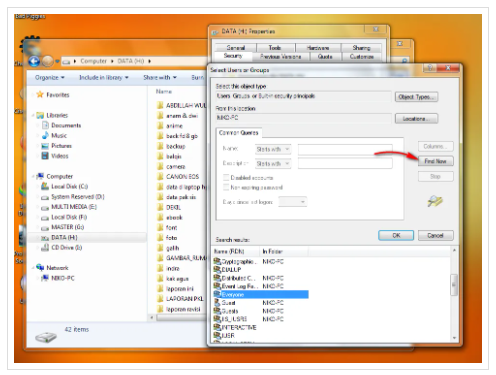
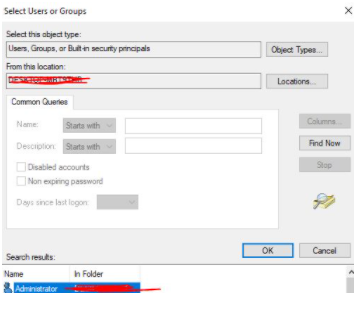
- The Select User or Group window will appear again, click the advanced button.

- In this section you can choose which users can access the shared data. Click find now first so that the user list will appear. Then just select Everyone. Click OK.
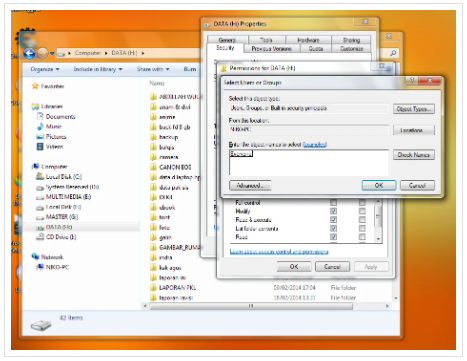
- The object names box is filled in, then click OK.
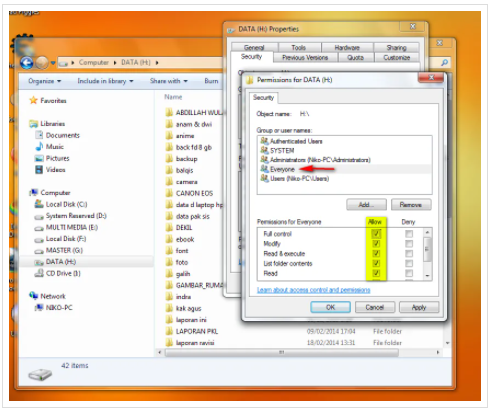
- Then set the permissions. Click Everyone first, then set the permissions as you like. If you have, click OK.
Checking / Checking Your Network Connection
You can view what knowledge is shared by typing the IP address of the computer running the share. In the address bar you type 192.168.1.12. IP address of course adjusts together with the one you use.
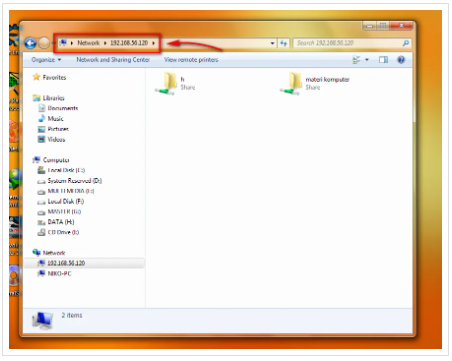
Or you can also directly via the network menu at the bottom.
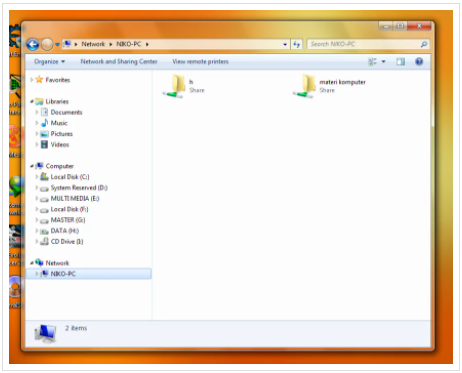
If your folders and drives are there, it means you’ve successfully shared your files.
Cannot Access File Sharing in Windows 10
The problem with network sharing is that you cannot access file sharing. This one problem is very disturbing. However, there is a very easy way. If there is a notification on this one, of course it will be very annoying, with the notification “Your folder cannot be shared”.
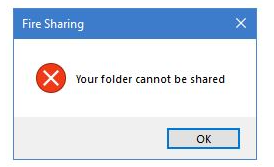
The following is a way to overcome the inability to access file sharing in Windows 10:
- Disable antivirus applications.
- Disable applications that you are currently using, because more than one application has closed sharing access to maintain the security of your folders & files.
- Give settings “Full Control” for All users.
- Select the folder you want to share via local network. Right click on the folder and click Properties from the menu bar.
- Go to the Sharing tab and click on the “Advanced Sharing” option.
- Check the box along with “Share this Folder”.
- Next, select Permissions to be “Full Control”.
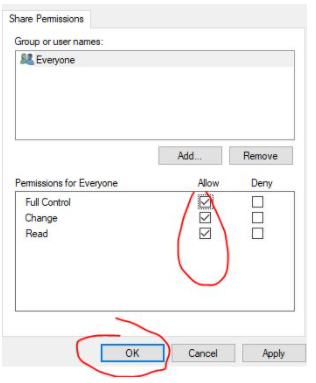
- Click Add and then select Advanced Options and click Find now.
- Select Authenticated users, click OK then click Full Control. Click OK and exit.
- Disable Password Protected Sharing
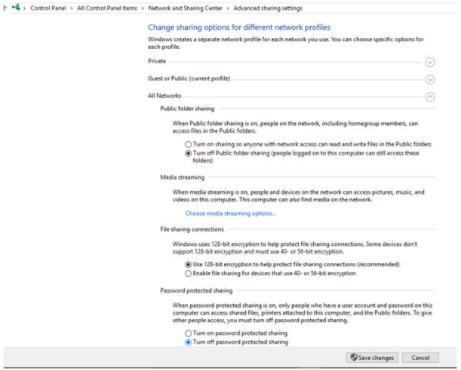
- While this solution is relatively straightforward, being aware that it may present specific risks as you can turn off password protection. While it’s light to disable password protection, you should be aware that your processes may be vulnerable to security threats. How:
- Open the Control Panel and click Network plus Sharing Center.
- Click Change connection sharing settings.
- Click the ‘down arrow’ under All Networks to expand the settings.
- In the Password protected sharing section, select Turn off Password protected sharing and save.
Interested in the service sharing files and folders from NetData? You can contact us here.
![]()


